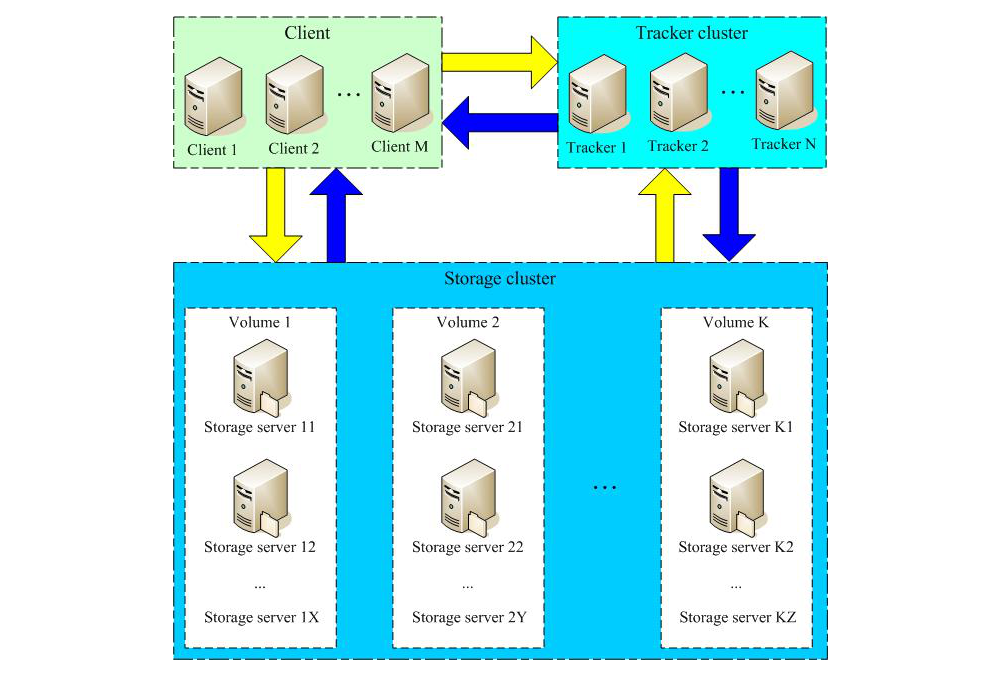
一、基本模块及高可用架构
FastDFS 是余庆老师开发的一个开源的高性能分布式文件系统(DFS)。 它的主要功能包括:文件存储,文件同步和文件访问,以及高容量和负载平衡。
FastDFS 系统有三个角色:跟踪服务器(Tracker Server)、存储服务器(Storage Server)和客户端(Client)。
- Tracker Server: 跟踪服务器,主要做调度工作,起到均衡的作用;负责管理所有的storage server和group,每个storage在启动后会连接 Tracker,告知自己所属 group 等信息,并保持周期性心跳。多个Tracker之间是对等关系,不存在单点故障。
- Storage Server: 存储服务器,主要提供容量和备份服务;以 group 为单位,每个 group 内可以有多台 storage server,组内的storage server上的数据互为备份。
- Client:客户端,上传下载数据的服务器
模块之间的主要关系如下:
二、环境准备工作
说明:本人使用的是docker 我先将所有基础软件安装到一个空白系统里,然后提交为一个基础镜像,然后以这个基础镜像为基本,启动多个容器来完成的此次试验
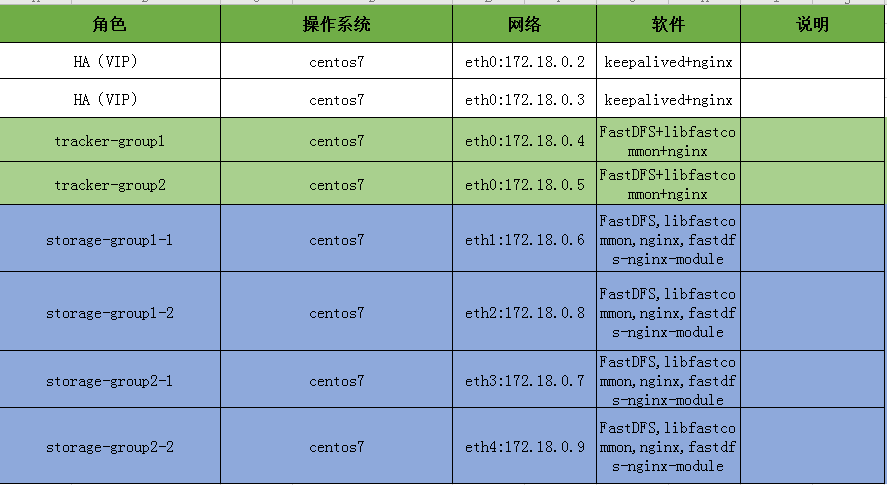
首先来配置2个Tracker机器
1.安装编译环境
|
1 2 3 4 |
yum groups install Development Tools -y yum install perl -y |
2. 安装libfastcommon
|
1 2 3 4 5 6 7 8 9 10 11 12 13 14 15 16 17 18 19 20 21 22 23 24 |
wget https://github.com/happyfish100/libfastcommon/archive/V1.0.39.tar.gz tar -zxvf libfastcommon-1.0.39.tar.gz cd libfastcommon-1.0.39/ ./make.sh ./make.sh install #libfastcommon默认安装到了 /usr/lib64/libfastcommon.so /usr/lib64/libfdfsclient.so #因为FastDFS主程序设置的lib目录是/usr/local/lib,所以需要创建软链接. ln -s /usr/lib64/libfastcommon.so /usr/local/lib/libfastcommon.so ln -s /usr/lib64/libfastcommon.so /usr/lib/libfastcommon.so ln -s /usr/lib64/libfdfsclient.so /usr/local/lib/libfdfsclient.so ln -s /usr/lib64/libfdfsclient.so /usr/lib/libfdfsclient.so |
3. 安装FastDFS
|
1 2 3 4 5 6 7 8 9 10 11 12 13 14 15 16 17 18 19 20 21 22 23 24 25 26 27 28 29 30 31 32 33 34 35 |
wget https://github.com/happyfish100/fastdfs/archive/V5.11.tar.gz tar -zxvf fastdfs-5.11.tar.gz cd fastdfs-5.11/ ./make.sh ./make.sh install #以下是文件位置说明 #如上采用默认编译安装方式,安装后的相应文件目录 A、服务脚本在: /etc/init.d/fdfs_storaged /etc/init.d/fdfs_tracker B、配置文件在(样例配置文件): /etc/fdfs/client.conf.sample /etc/fdfs/storage.conf.sample /etc/fdfs/tracker.conf.sample C、命令工具在/usr/bin/目录下的: fdfs_appender_test fdfs_appender_test1 fdfs_append_file fdfs_crc32 fdfs_delete_file fdfs_download_file fdfs_file_info fdfs_monitor fdfs_storaged fdfs_test fdfs_test1 fdfs_trackerd fdfs_upload_appender fdfs_upload_file stop.sh restart.sh |
因为FastDFS服务脚本设置的bin目录是/usr/local/bin,但实际命令安装在/usr/bin,可以进入/user/bin目录使用以下命令查看fdfs的相关命令:
|
1 2 3 4 5 6 7 8 |
cd /usr/bin/ ls | grep fdfs 因此需要修改FastDFS服务脚本中相应的命令路径,也就是把/etc/init.d/fdfs_storaged和/etc/init.d/fdfs_tracker两个脚本中的/usr/local/bin修改成/usr/bin: # vim /etc/init.d/fdfs_trackerd 使用查找替换命令进统一修改:%s+/usr/local/bin+/usr/bin # vim /etc/init.d/fdfs_storaged 使用查找替换命令进统一修改:%s+/usr/local/bin+/usr/bin |
复制FastDFS跟踪器样例配置文件,并重命名
|
1 2 3 4 5 6 7 8 9 10 11 12 13 14 15 |
#tracker节点 cp /etc/fdfs/tracker.conf.sample /etc/fdfs/tracker.conf vim /etc/fdfs/tracker.conf #修改内容如下 disabled=false #配置文件是否不生效,false为生效 port=22122 #tracker的端口号,提供服务的端口 base_path=/data/tracker #Tracker数据和日志目录地址(根目录必须存在,子目录会自动创建) store_lookup=0 #0为轮循,1为指定哪个组,2为负载平衡,哪个组剩余空间大去哪个 #以上tracker.conf暂时只改这几个参数,其他不做修改 然后将这个配置文件复制到其他tracker机器使之保持一致 scp -r tracker.conf 172.18.0.5:/etc/fdfs/ #创建基础数据目录(参考基础目录base_path配置): mkdir /data/tracker |
防火墙中打开跟踪器端口(默认为22122):
|
1 2 3 4 5 |
vim /etc/sysconfig/iptables #添加如下端口行: -A INPUT -m state --state NEW -m tcp -p tcp --dport 22122 -j ACCEPT #重启防火墙 service iptables restart |
启动Tracker:
|
1 2 3 4 5 6 7 |
/etc/init.d/fdfs_trackerd start 初次成功启动,会在/data/tracked目录下创建data、logs两个目录)可以通过以下两个方法查看tracker是否启动成功: (1)查看22122端口监听情况:netstat -unltp|grep fdfs (2)通过以下命令查看tracker的启动日志,看是否有错误 tail -100f /data/fastdfs/logs/trackerd.log |
关闭Tracker:
|
1 |
/etc/init.d/fdfs_trackerd stop |

设置FastDFS跟踪器开机启动:
|
1 2 3 4 5 |
vim /etc/rc.d/rc.local 添加以下内容: /etc/init.d/fdfs_trackerd start |
到此trackerd机器配置完成,另一台trackerd机器也相同配置就好。
——————————————fastDFS存储配置—————————————
三、配置FastDFS存储 ( 接下来配置storage 存储节点。)
继续接以tracker配置继续配置storage(你可以把上面的tracker打包成一个镜像,然后启动,在他的基础上继续配置storage,也可以把storage配置完后再打包成镜像,然后启动各自使用各自功能就好,当然你也可以新开一台机器,再次安装FastDFS然后再配置storage)
复制FastDFS存储器样例配置文件,并重命名:
|
1 2 3 4 5 6 7 8 9 10 11 12 13 14 15 |
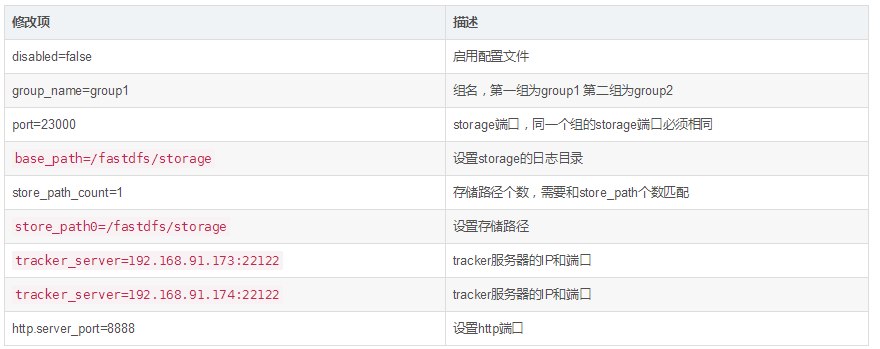
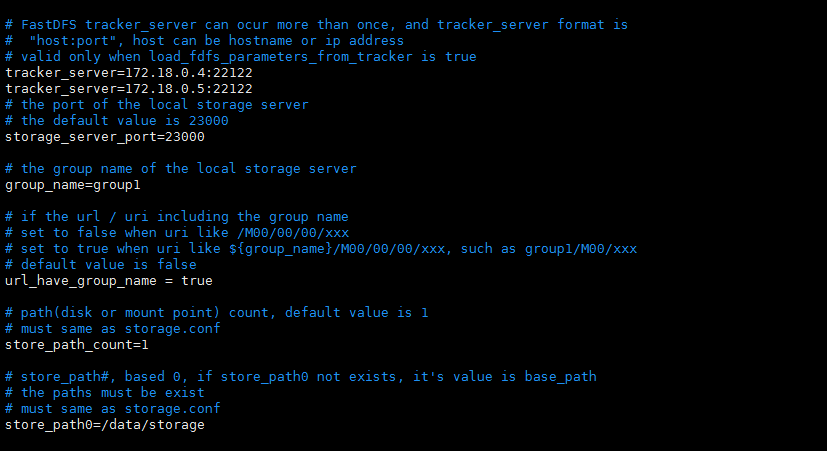
#storage节点 cp /etc/fdfs/storage.conf.sample /etc/fdfs/storage.conf vim /etc/fdfs/storage.conf 修改的内容如下: disabled=false #配置文件是否不生效,false为生效 group_name=group1 #组名(第一组为group1(172.17.0.6,172.17.0.8),第二组为group2(172.17.0.7,172.17.0.9)相同组请保持组名一样即可) port=23000 #storage的端口号,同一个组的storage端口号必须相同 base_path=/data/storage #设置storage的日志目录(需手动创建,放在哪自己定义) store_path0=/data/storage #存储路径(需手动创建) store_path_count=1 #存储路径个数,需要和store_path个数匹配 tracker_server=172.18.0.4:22122 #tracker服务器的IP地址和端口 tracker_server=172.18.0.5:22122 #多个tracker直接添加多条配置 http.server_port=8081 #设置http端口号 |
创建基础数据目录(参考基础目录base_path配置):
|
1 |
mkdir -p /data/storage |
防火墙中打开存储器端口(默认为23000):
|
1 2 3 4 5 |
vim /etc/sysconfig/iptables #添加如下端口 -A INPUT -m state --state NEW -m tcp -p tcp --dport 23000 -j ACCEPT #重启防火墙 service iptables restart |
启动Storage:
|
1 2 3 4 5 6 7 |
#启动前请先启动tracker要不storaged启动不了 /etc/init.d/fdfs_storaged start #启动 /etc/init.d/fdfs_storaged stop #关闭 (初次成功启动,会在/data/storage目录下创建数据目录data 和日志目录logs)各节点启动动,使用 tail -f /data/storage/logs/storaged.log 命令监听存储节点日志,可以看到存储节点链接到跟踪器,并提示哪一个为leader跟踪器。同时也会看到同一组中的其他节点加入进来的日志信息。 查看23000端口监听情况:netstat -unltp|grep fdfs |
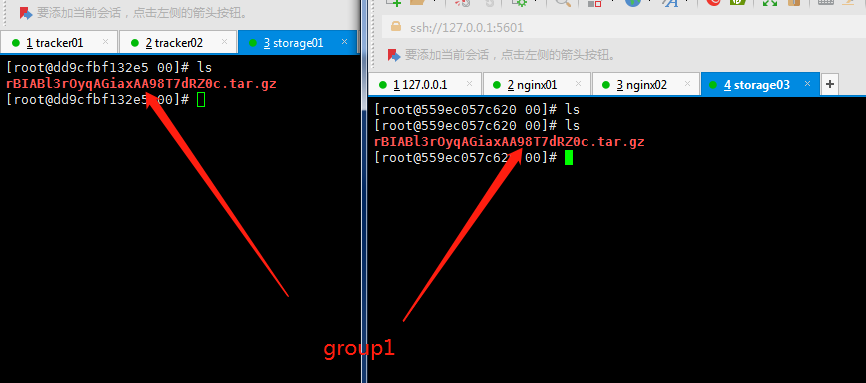
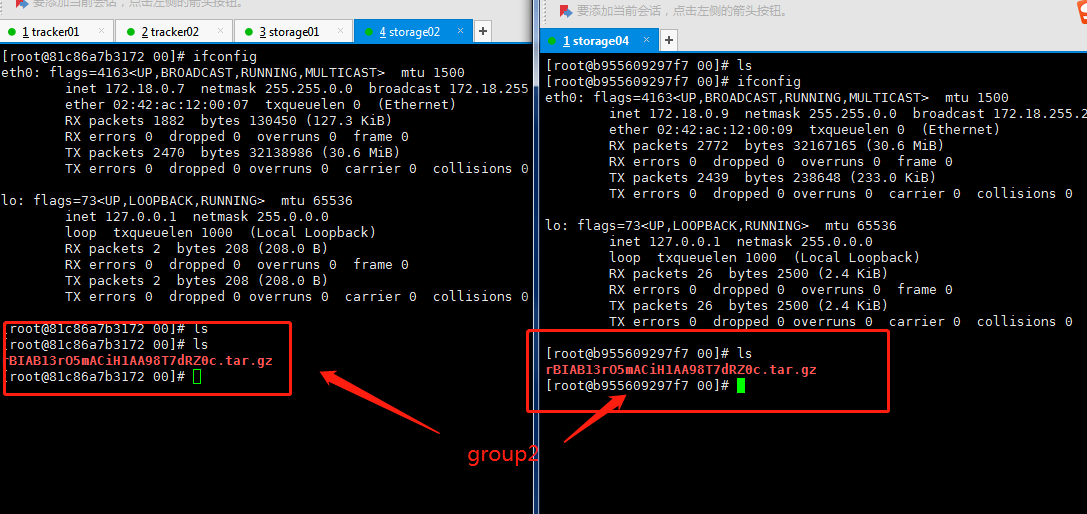
配置完storage后,我把当前配置打包成docker镜像,分别启动2台作为tracker,并启动tracker服务,然后再分别启动4台作为storage并启动storage服务
于是当前我相当于有了6台服务器,2个tracker服务器,4台storage服务器
|
1 2 3 4 5 |
因为默认的有2台机器(172.17.0.6,172.17.0.8)默认配置了为group1 我需要配置另外2台(172.17.0.7,172.17.0.9)storage服务器 将他们的配置文件 /etc/fdfs/storage.conf group_name 更改为group2 #注意每组组名称请保持一致 并且设置它们开机启动(4台都要设置) |
设置FastDFS(storage)存储器开机启动:
|
1 2 3 |
vim /etc/rc.d/rc.local #添加 /etc/init.d/fdfs_storaged start |
所有Storage节点都启动之后,可以在任意Storage节点上使用如下命令查看集群信息:
|
1 2 3 4 5 6 7 8 9 10 11 12 13 14 15 16 17 18 19 20 21 22 23 24 25 26 27 28 29 30 31 32 33 34 35 36 37 38 39 40 41 42 43 44 45 46 47 48 49 50 51 52 53 54 55 56 57 58 59 60 61 62 63 64 65 66 67 68 69 70 71 72 73 74 75 76 77 78 79 80 81 82 83 84 85 86 87 88 89 90 91 92 93 94 95 96 97 98 99 100 101 102 103 104 105 106 107 108 109 110 111 112 113 114 115 116 117 118 119 120 121 122 123 124 125 126 127 128 129 130 131 132 133 134 135 136 137 138 139 140 141 142 143 144 145 146 147 148 149 150 151 152 153 154 155 156 157 158 159 160 161 162 163 164 165 166 167 168 169 170 171 172 173 174 175 176 177 178 179 180 181 182 183 184 185 186 187 188 189 190 191 192 193 194 195 196 197 198 199 200 201 202 203 204 205 206 207 208 209 210 211 212 213 214 215 216 217 218 219 220 221 222 223 224 225 226 227 228 229 230 231 232 233 234 235 236 237 238 239 240 241 242 243 244 245 246 247 248 249 250 251 252 253 254 255 256 257 258 259 260 261 262 263 264 265 266 267 268 269 270 271 272 273 274 275 276 277 278 279 280 281 282 283 284 285 286 287 288 289 290 291 |
执行如下命令: /usr/bin/fdfs_monitor /etc/fdfs/storage.conf 得到结果如下则表示成功: [root@b955609297f7 ~]# /usr/bin/fdfs_monitor /etc/fdfs/storage.conf [2019-12-07 05:35:58] DEBUG - base_path=/data/storage, connect_timeout=30, network_timeout=60, tracker_server_count=2, anti_steal_token=0, anti_steal_secret_key length=0, use_connection_pool=0, g_connection_pool_max_idle_time=3600s, use_storage_id=0, storage server id count: 0 server_count=2, server_index=1 tracker server is 172.18.0.5:22122 group count: 2 Group 1: group name = group1 disk total space = 40188 MB disk free space = 27789 MB trunk free space = 0 MB storage server count = 2 active server count = 2 storage server port = 23000 storage HTTP port = 8081 store path count = 1 subdir count per path = 256 current write server index = 0 current trunk file id = 0 Storage 1: id = 172.18.0.6 ip_addr = 172.18.0.6 (storage01.my_net) ACTIVE http domain = version = 5.11 join time = 2019-12-07 02:42:04 up time = 2019-12-07 04:47:18 total storage = 40188 MB free storage = 27789 MB upload priority = 10 store_path_count = 1 subdir_count_per_path = 256 storage_port = 23000 storage_http_port = 8081 current_write_path = 0 source storage id = if_trunk_server = 0 connection.alloc_count = 256 connection.current_count = 1 connection.max_count = 1 total_upload_count = 10 success_upload_count = 10 total_append_count = 0 success_append_count = 0 total_modify_count = 0 success_modify_count = 0 total_truncate_count = 0 success_truncate_count = 0 total_set_meta_count = 0 success_set_meta_count = 0 total_delete_count = 0 success_delete_count = 0 total_download_count = 0 success_download_count = 0 total_get_meta_count = 0 success_get_meta_count = 0 total_create_link_count = 0 success_create_link_count = 0 total_delete_link_count = 0 success_delete_link_count = 0 total_upload_bytes = 9516533 success_upload_bytes = 9516533 total_append_bytes = 0 success_append_bytes = 0 total_modify_bytes = 0 success_modify_bytes = 0 stotal_download_bytes = 0 success_download_bytes = 0 total_sync_in_bytes = 0 success_sync_in_bytes = 0 total_sync_out_bytes = 0 success_sync_out_bytes = 0 total_file_open_count = 10 success_file_open_count = 10 total_file_read_count = 0 success_file_read_count = 0 total_file_write_count = 40 success_file_write_count = 40 last_heart_beat_time = 2019-12-07 05:35:48 last_source_update = 2019-12-07 04:33:26 last_sync_update = 1970-01-01 00:00:00 last_synced_timestamp = 1970-01-01 00:00:00 (never synced) Storage 2: id = 172.18.0.8 ip_addr = 172.18.0.8 (storage03.my_net) ACTIVE http domain = version = 5.11 join time = 2019-12-07 02:42:04 up time = 2019-12-07 04:48:34 total storage = 40188 MB free storage = 27789 MB upload priority = 10 store_path_count = 1 subdir_count_per_path = 256 storage_port = 23000 storage_http_port = 8081 current_write_path = 0 source storage id = if_trunk_server = 0 connection.alloc_count = 256 connection.current_count = 1 connection.max_count = 1 total_upload_count = 10 success_upload_count = 10 total_append_count = 0 success_append_count = 0 total_modify_count = 0 success_modify_count = 0 total_truncate_count = 0 success_truncate_count = 0 total_set_meta_count = 0 success_set_meta_count = 0 total_delete_count = 0 success_delete_count = 0 total_download_count = 0 success_download_count = 0 total_get_meta_count = 0 success_get_meta_count = 0 total_create_link_count = 0 success_create_link_count = 0 total_delete_link_count = 0 success_delete_link_count = 0 total_upload_bytes = 9516533 success_upload_bytes = 9516533 total_append_bytes = 0 success_append_bytes = 0 total_modify_bytes = 0 success_modify_bytes = 0 stotal_download_bytes = 0 success_download_bytes = 0 total_sync_in_bytes = 0 success_sync_in_bytes = 0 total_sync_out_bytes = 0 success_sync_out_bytes = 0 total_file_open_count = 10 success_file_open_count = 10 total_file_read_count = 0 success_file_read_count = 0 total_file_write_count = 40 success_file_write_count = 40 last_heart_beat_time = 2019-12-07 05:35:37 last_source_update = 2019-12-07 04:33:26 last_sync_update = 1970-01-01 00:00:00 last_synced_timestamp = 1970-01-01 00:00:00 (never synced) Group 2: group name = group2 disk total space = 40188 MB disk free space = 27789 MB trunk free space = 0 MB storage server count = 2 active server count = 2 storage server port = 23000 storage HTTP port = 8081 store path count = 1 subdir count per path = 256 current write server index = 0 current trunk file id = 0 Storage 1: id = 172.18.0.7 ip_addr = 172.18.0.7 (storage02.my_net) ACTIVE http domain = version = 5.11 join time = 2019-12-07 02:42:29 up time = 2019-12-07 04:47:09 total storage = 40188 MB free storage = 27789 MB upload priority = 10 store_path_count = 1 subdir_count_per_path = 256 storage_port = 23000 storage_http_port = 8081 current_write_path = 0 source storage id = if_trunk_server = 0 connection.alloc_count = 256 connection.current_count = 1 connection.max_count = 1 total_upload_count = 73 success_upload_count = 73 total_append_count = 0 success_append_count = 0 total_modify_count = 0 success_modify_count = 0 total_truncate_count = 0 success_truncate_count = 0 total_set_meta_count = 0 success_set_meta_count = 0 total_delete_count = 0 success_delete_count = 0 total_download_count = 0 success_download_count = 0 total_get_meta_count = 0 success_get_meta_count = 0 total_create_link_count = 0 success_create_link_count = 0 total_delete_link_count = 0 success_delete_link_count = 0 total_upload_bytes = 64392845 success_upload_bytes = 64392845 total_append_bytes = 0 success_append_bytes = 0 total_modify_bytes = 0 success_modify_bytes = 0 stotal_download_bytes = 0 success_download_bytes = 0 total_sync_in_bytes = 0 success_sync_in_bytes = 0 total_sync_out_bytes = 0 success_sync_out_bytes = 0 total_file_open_count = 73 success_file_open_count = 73 total_file_read_count = 0 success_file_read_count = 0 total_file_write_count = 292 success_file_write_count = 292 last_heart_beat_time = 2019-12-07 05:35:41 last_source_update = 2019-12-07 04:34:33 last_sync_update = 1970-01-01 00:00:00 last_synced_timestamp = 1970-01-01 00:00:00 (never synced) Storage 2: id = 172.18.0.9 ip_addr = 172.18.0.9 (b955609297f7) ACTIVE http domain = version = 5.11 join time = 2019-12-07 02:42:04 up time = 2019-12-07 04:53:10 total storage = 40188 MB free storage = 27789 MB upload priority = 10 store_path_count = 1 subdir_count_per_path = 256 storage_port = 23000 storage_http_port = 8081 current_write_path = 0 source storage id = if_trunk_server = 0 connection.alloc_count = 256 connection.current_count = 1 connection.max_count = 1 total_upload_count = 10 success_upload_count = 10 total_append_count = 0 success_append_count = 0 total_modify_count = 0 success_modify_count = 0 total_truncate_count = 0 success_truncate_count = 0 total_set_meta_count = 0 success_set_meta_count = 0 total_delete_count = 0 success_delete_count = 0 total_download_count = 0 success_download_count = 0 total_get_meta_count = 0 success_get_meta_count = 0 total_create_link_count = 0 success_create_link_count = 0 total_delete_link_count = 0 success_delete_link_count = 0 total_upload_bytes = 9516533 success_upload_bytes = 9516533 total_append_bytes = 0 success_append_bytes = 0 total_modify_bytes = 0 success_modify_bytes = 0 stotal_download_bytes = 0 success_download_bytes = 0 total_sync_in_bytes = 31899690 success_sync_in_bytes = 31899690 total_sync_out_bytes = 0 success_sync_out_bytes = 0 total_file_open_count = 46 success_file_open_count = 46 total_file_read_count = 0 success_file_read_count = 0 total_file_write_count = 184 success_file_write_count = 184 last_heart_beat_time = 2019-12-07 05:35:42 last_source_update = 2019-12-07 04:33:26 last_sync_update = 2019-12-07 04:54:09 last_synced_timestamp = 2019-12-07 04:34:33 (0s delay) |
四.文件上传测试 (注意是在Tracker服务器中进行测试)
修改Tracker服务器中的客户端配置文件(2台都配置下):
|
1 2 3 4 5 6 7 |
cp /etc/fdfs/client.conf.sample /etc/fdfs/client.conf vim /etc/fdfs/client.conf #修改内容如下(其他内容不必修改) base_path=/data/tracker tracker_server=172.18.0.4:22122 tracker_server=172.18.0.5:22122 |
执行如下文件上传命令
|
1 2 3 4 5 6 |
/usr/bin/fdfs_upload_file /etc/fdfs/client.conf [文件] 返回ID号: group1/M00/00/00/wKgA511Rd26AGFkIAAVFOL7FJU4.tar.gz group2/M00/00/00/wKgA6V1Rd56AJChCAAVFOL7FJU4.tar.gz (能返回以上文件ID,说明文件上传成功) |
因为采用的是轮询算法。所以group1 和 group2 会轮流。 如果group1组里有2个节点那么这2个节点的storage中文件时保持一致的。
关于tracker轮询算法修改:
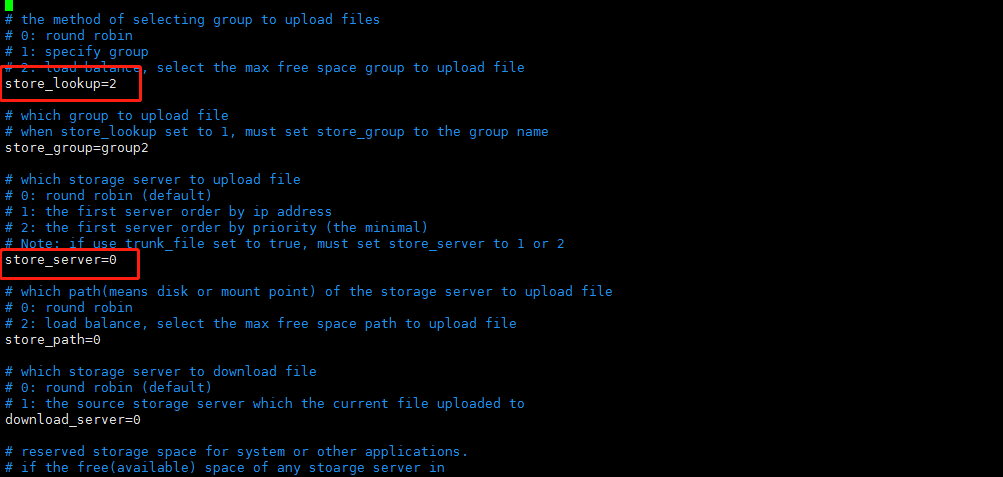
tarcker文件详细解析:
|
1 2 3 4 5 6 7 8 9 10 11 12 13 14 15 16 17 18 19 20 21 22 23 24 25 26 27 28 29 30 31 32 33 34 35 36 37 38 39 40 41 42 43 44 45 46 47 48 49 50 51 52 53 54 55 56 57 58 59 60 61 62 63 64 65 66 67 68 69 70 71 72 73 74 75 76 77 78 79 80 81 82 83 84 85 86 87 88 89 90 91 92 93 94 95 96 97 98 99 100 101 102 103 104 105 106 107 108 109 110 111 112 113 114 115 116 117 118 119 120 121 122 123 124 125 126 127 128 129 130 131 132 133 134 135 136 137 138 139 140 141 142 143 144 145 146 147 148 149 150 151 152 153 154 155 156 157 158 159 160 161 162 163 164 165 166 167 168 169 170 171 172 173 174 175 176 177 178 179 180 181 182 183 184 185 186 187 188 189 190 191 192 193 194 195 196 197 198 199 200 201 202 203 204 205 206 207 208 209 210 211 212 213 214 215 216 217 218 219 220 221 222 223 224 225 226 227 228 229 230 231 232 233 234 235 236 237 238 239 240 241 242 243 244 245 246 247 248 249 250 251 252 253 254 255 256 257 258 259 260 261 262 263 264 265 266 267 268 269 270 271 272 273 274 275 276 277 278 279 280 281 282 283 284 285 286 287 288 289 290 291 292 293 294 295 296 297 298 299 300 301 302 303 304 305 306 307 308 309 310 311 312 313 314 315 316 317 318 319 320 321 322 323 324 325 326 327 328 329 330 331 332 333 334 335 336 337 338 339 340 341 342 343 344 345 346 347 348 349 350 351 352 353 354 355 356 357 358 359 360 361 362 363 364 365 366 367 368 369 370 371 372 373 374 375 376 377 378 379 380 381 382 383 384 385 386 387 388 389 390 391 392 393 394 395 396 397 398 399 400 401 402 403 404 405 406 407 408 409 410 411 412 413 414 415 416 417 418 419 420 421 422 423 424 425 426 427 428 429 430 431 432 433 434 435 436 437 438 439 440 441 442 443 444 445 446 447 448 449 450 451 452 453 454 455 456 457 458 459 460 461 462 463 |
vim /etc/fdfs/tarcker.conf 普通情况下我只修改以下这些参数: base_path=/home/fastdfs/tracer download_server=1 log_level=info http.server_port=8080 work_threads=8 rotate_error_log = true use_trunk_file = true trunk_create_file_space_threshold = 100M(本机测试才会设置这么小) log_file_keep_days = 7 下面是配置的翻译和详细的说明: # 这个配置文件是否失效 disabled=false # 可以版定一个ip,默认为空,绑定所有ip bind_addr= # trace server的监听端口 port=22122 # 连接超时时间,针对socket套接字函数connect,默认为30秒 connect_timeout=30 # 网络通讯超时时间,默认是60秒 network_timeout=60 # 工作文件夹,trace的日志也存在此 # 附目录说明: # tracker server目录及文件结构: # ${base_path} # |__data # | |__storage_groups.dat:存储分组信息 # | |__storage_servers.dat:存储服务器列表 # |__logs # |__trackerd.log:tracker server日志文件 # 数据文件storage_groups.dat和storage_servers.dat中的记录之间以换行符(\n)分隔,字段之间以西文逗号(,)分隔。 # storage_groups.dat中的字段依次为: # 1. group_name:组名 # 2. storage_port:storage server端口号 # storage_servers.dat中记录storage server相关信息,字段依次为: # 1. group_name:所属组名 # 2. ip_addr:ip地址 # 3. status:状态 # 4. sync_src_ip_addr:向该storage server同步已有数据文件的源服务器 # 5. sync_until_timestamp:同步已有数据文件的截至时间(UNIX时间戳) # 6. stat.total_upload_count:上传文件次数 # 7. stat.success_upload_count:成功上传文件次数 # 8. stat.total_set_meta_count:更改meta data次数 # 9. stat.success_set_meta_count:成功更改meta data次数 # 10. stat.total_delete_count:删除文件次数 # 11. stat.success_delete_count:成功删除文件次数 # 12. stat.total_download_count:下载文件次数 # 13. stat.success_download_count:成功下载文件次数 # 14. stat.total_get_meta_count:获取meta data次数 # 15. stat.success_get_meta_count:成功获取meta data次数 # 16. stat.last_source_update:最近一次源头更新时间(更新操作来自客户端) # 17. stat.last_sync_update:最近一次同步更新时间(更新操作来自其他storage server的同步) base_path=/home/fastdfs/tracer # 本traceserver最大连接数 max_connections=256 # 接收数据的线程数 # 默认1个 # since V4.07 accept_threads=1 # 工作线程数,小于max_connections # 默认4个 work_threads=4 # 文件上传选取group的规则: # 0:轮询 # 1:指定服务器组 # 2:负载均衡,文件上传到可用空间最大的group store_lookup=2 # 当store_lookup设置为1时,指定上传的group store_group=group1 # 上传文件选择服务器的规则 # 0:轮询(默认) # 1:按照IP排序,排在第一的server # 2:按照优先级排序,最小的server store_server=0 # 上传文件选择路劲的规则 # 0:轮询(默认) # 2:负载均衡,选择可用空间最大的文件夹 store_path=0 # 下载文件选择服务器的规则 # 0:轮询(默认) # 1:上传到那台服务器,就从哪台服务器下载 download_server=0 # 为系统或其他应用程序保留存储空间 # 如果本机的剩余存储空间小于保留空间,那么本group不再允许上传文件 # 默认单位是byte ### G or g for gigabyte(GB) ### M or m for megabyte(MB) ### K or k for kilobyte(KB) ### no unit for byte(B) ### XX.XX% as ratio such as reserved_storage_space = 10% reserved_storage_space = 10% #日志级别 ### emerg for emergency ### alert ### crit for critical ### error ### warn for warning ### notice ### info ### debug log_level=info # 运行本进程的Unix用户组,如果不设置,默认是当前用户所在的group run_by_group= # 运行本进程的用户名,如果不设置,默认是当前用户的用户名 run_by_user= # 可以连接到本机的主机ip范围,*代表允许所有服务器 # 支持这样的表达式:10.0.1.[1-15,20] or host[01-08,20-25].domain.com allow_hosts=* # 将缓存中的日志落地到磁盘的间隔时间,默认是10秒 sync_log_buff_interval = 10 # 检查storage server是否可用的心跳时间,默认是120秒 # storage server定期向tracker server 发心跳,如果tracker server在一个check_active_interval内还没有收到storage server的一次心跳,那边将认为该storage server已经下线。所以本参数值必须大于storage server配置的心跳时间间隔。通常配置为storage server心跳时间间隔的2倍或3倍。 check_active_interval = 120 # 线程栈大小,默认64k,不建议设置小于64k thread_stack_size = 64KB # 当集群中的storage server的ip变化的时候,集群是否自动调整 # 默认值为true storage_ip_changed_auto_adjust = true # 存储服务器同步一个文件需要消耗的最大时间,缺省为86400s,即一天。 # 注:本参数并不影响文件同步过程。本参数仅在下载文件时,作为判断当前文件是否被同步完成的一个标准 storage_sync_file_max_delay = 86400 # 存储服务器之间同步文件的最大延迟时间,缺省为300s,即五分钟。 # 注:本参数并不影响文件同步过程。本参数仅在下载文件时,作为判断当前文件是否被同步完成的一个标准 storage_sync_file_max_time = 300 # 是否启用使用一个trunk file来存储数个小文件的模式 # 默认值为false use_trunk_file = false # trunk file分配的最小容量,建议小于4k,默认值是256字节 # 一个文件如果小于256字节,也会在trunk file中分配到256字节 slot_min_size = 256 # 上传的文件的大小小于这个配置值的时候,会被存储到trunk file中 # slot_max_size > slot_min_size slot_max_size = 16MB # trunk file文件大小 trunk_file_size = 64MB # 是否提前创建trunk file,默认值为false trunk_create_file_advance = false # 如果提前创建trunk file,按照这个配置设置的时间来创建 trunk_create_file_time_base = 02:00 # 创建trunk file的时间间隔, 单位为秒 # 如果每天只提前创建一次,则设置为86400 trunk_create_file_interval = 86400 # 当可用的trunk file的尺寸小于此阈值,我们创建trunkfile # 比如trunk file的可用尺寸为16G,小于20G,那么会创建4GB的trunk file trunk_create_file_space_threshold = 20G # 在加载trunk file 的时候是否检查可用空间是否被占用的 # 默认是false ,如果设置为true,会减慢加载trunk file的速度。 trunk_init_check_occupying = false # 是否忽略快照文件storage_trunk.dat,只从读取的是trunk binlog的offset,然后从binlog的offset开始加载 # 缺省为false。只要当从v3.10以下版本升级到v3.10以上版本时,可能才需要打开本选项。 trunk_init_reload_from_binlog = false # 压缩trunk binlog 的最小时间间隔,单位:秒 # 默认值为0,0代表不压缩 # FastDFS会在trunk初始化或者被销毁的时候压缩trunk binlog文件 # 建议设置成86400,一天设置一次 trunk_compress_binlog_min_interval = 0 # 是否使用storage id 替换 ip,默认为false use_storage_id = false # 指定storage id的文件名,允许使用绝对路径 storage_ids_filename = storage_ids.conf # storage server的id类型 # ip:ip地址 # id:服务器的id名称 # id type of the storage server in the filename, values are: # 只有use_storage_id为true时,本配置才有用 id_type_in_filename = ip # 存储从文件是否采用symbol link(符号链接)方式 # 默认为false , 如果设置为true,一个从文件将占用两个文件:原始文件及指向它的符号链接。 store_slave_file_use_link = false # 是否定期轮转error log,目前仅支持一天轮转一次 rotate_error_log = false # 如果按天轮转错误日志,具体生成新错误日志文件的时间 # Hour from 0 to 23, Minute from 0 to 59 error_log_rotate_time=00:00 # 是否在错误日志文件达到一定大小时生成新的错误日志文件 # 0代表对日志文件大小不敏感 rotate_error_log_size = 0 # 日志文件保存日期 # 0表示永久保存,不删除 # 默认为0 log_file_keep_days = 0 # 是否使用连接池,默认不使用 use_connection_pool = false # 连接池中连接的超时时间,单位为秒 connection_pool_max_idle_time = 3600 # HTTP端口 http.server_port=8888 # 通过HTTP借口检查storage是否可用,默认心跳时间为30秒 http.check_alive_interval=30 # 检查storage server是否可用的方式: # tcp表示,只要能建立连接就算服务器可用 # http表示,建立连接后,还需要发送一个请求到http.check_alive_uri,并且收到200应答 # default value is tcp http.check_alive_type=tcp # 检查storage server是否可用的http页面地址 http.check_alive_uri=/status.html 选择目录并生成文件名 当选定存储目录后,storage Server会为文件生成一个file_id,然后将文件路由到一个二级目录,并以file_id为文件名存储到该子目录。当文件存储到某个子目录后,即认为该文件存储成功,接下来会为该文件生成一个文件名,文件名由group、存储目录、两级子目录、fileid、文件后缀名(由客户端指定,主要用于区分文件类型)拼接而成。 |


给各个存储节点(storaged)安装nginx的 fastdfs-nginx-module
|
1 2 |
安装nginx前先检查依赖 yum install gcc gcc-c++ make automake autoconf libtool pcre pcre-devel zlib zlib-devel openssl openssl-devel |
nginx源码安装过程看这里 这里不赘述了
fastdfs-nginx-module作用说明
|
1 |
FastDFS通过Tracker服务器,将文件放在Storage服务器存储,但是同组存储服务器之间需要进入文件复制,有同步延迟的问题。假设Tracker服务器将文件上传到了192.168.0.6,上传成功后文件ID已经返回给客户端。此时FastDFS存储集群机制会将这个文件同步到同组存储192.168.0.8,在文件还没有复制完成的情况下,客户端如果用这个文件ID在192.168.0.8上取文件,就会出现文件无法访问的错误。而fastdfs-nginx-module可以重定向文件连接到源服务器取文件,避免客户端由于复制延迟导致的文件无法访问错误。(解压后的fastdfs-nginx-module在nginx安装时使用) |
上传fastdfs-nginx-module_v1.20.tar.gz到/usr/local/src
|
1 2 3 4 5 6 7 8 |
cd /usr/local/src/ wget https://github.com/happyfish100/fastdfs-nginx-module/archive/V1.20.tar.gz #注意如果你的tracker和storage在一台机器这个模块也提前装一下,下面要用,否则一会还得装这个模块 wget http://labs.frickle.com/files/ngx_cache_purge-2.3.tar.gz tar -zxvf fastdfs-nginx-module_v1.20.tar.gz |
修改fastdfs-nginx-module的config配置文件
|
1 2 3 4 5 6 7 |
vim /usr/local/src/fastdfs-nginx-module/src/config CORE_INCS= "$CORE_INCS /usr/local/include/fastdfs /usr/local/include/fastcommon/" 修改为: CORE_INCS="$CORE_INCS /usr/include/fastdfs /usr/include/fastcommon/" 注意:这个路径修改是很重要的,不然在nginx编译的时候会报错的 |
/usr/local/src/fastdfs-nginx-module/src/config 完整配置
|
1 2 3 4 5 6 7 8 9 10 11 12 13 14 15 16 17 18 |
ngx_addon_name=ngx_http_fastdfs_module if test -n "${ngx_module_link}"; then ngx_module_type=HTTP ngx_module_name=$ngx_addon_name CORE_INCS="$CORE_INCS /usr/include/fastdfs /usr/include/fastcommon/" ngx_module_libs="-lfastcommon -lfdfsclient" ngx_module_srcs="$ngx_addon_dir/ngx_http_fastdfs_module.c" ngx_module_deps= CFLAGS="$CFLAGS -D_FILE_OFFSET_BITS=64 -DFDFS_OUTPUT_CHUNK_SIZE='256*1024' -DFDFS_MOD_CONF_FILENAME='\"/etc/fdfs/mod_fastdfs.conf\"'" . auto/module else HTTP_MODULES="$HTTP_MODULES ngx_http_fastdfs_module" NGX_ADDON_SRCS="$NGX_ADDON_SRCS $ngx_addon_dir/ngx_http_fastdfs_module.c" CORE_INCS="$CORE_INCS /usr/include/fastdfs /usr/include/fastcommon/" CORE_LIBS="$CORE_LIBS -lfastcommon -lfdfsclient" CFLAGS="$CFLAGS -D_FILE_OFFSET_BITS=64 -DFDFS_OUTPUT_CHUNK_SIZE='256*1024' -DFDFS_MOD_CONF_FILENAME='\"/etc/fdfs/mod_fastdfs.conf\"'" fi |
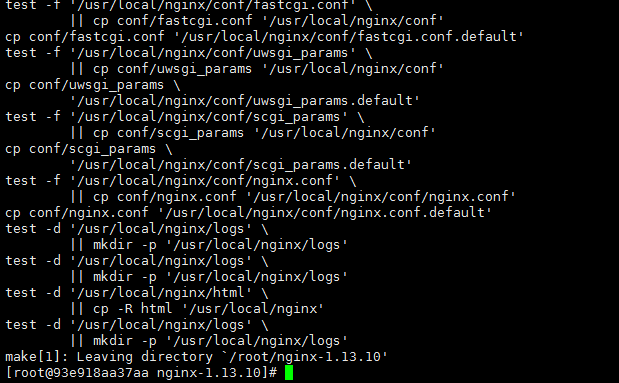
编译安装Nginx(添加fastdfs-nginx-module模块 )
|
1 2 3 4 5 6 7 8 |
wget http://nginx.org/download/nginx-1.13.10.tar.gz cd nginx-1.13.10 ./configure --prefix=/usr/local/nginx --add-module=/usr/local/src/fastdfs-nginx-module/src --add-module=/usr/local/src/ngx_cache_purge make && make install #更完整一点组件安装如下 ./configure --prefix=/usr/local/nginx --sbin-path=/usr/local/nginx/sbin/nginx --conf-path=/usr/local/nginx/conf/nginx.conf --error-log-path=/var/log/nginx/error.log --http-log-path=/var/log/nginx/access.log --pid-path=/var/run/nginx/nginx.pid --lock-path=/var/lock/nginx.lock --with-http_ssl_module --with-http_stub_status_module --with-http_gzip_static_module --http-client-body-temp-path=/var/tmp/nginx/client/ --http-proxy-temp-path=/var/tmp/nginx/proxy/ --http-fastcgi-temp-path=/var/tmp/nginx/fcgi/ --http-uwsgi-temp-path=/var/tmp/nginx/uwsgi --http-scgi-temp-path=/var/tmp/nginx/scgi --with-stream --with-pcre --with-stream --add-module=/usr/local/src/fastdfs-nginx-module/src |
复制fastdfs-nginx-module源码中的配置文件到/etc/fdfs目录,并修改
|
1 2 3 |
cp /root/fastdfs-nginx-module-1.20/src/mod_fastdfs.conf /etc/fdfs/ vim /etc/fdfs/mod_fastdfs.conf |
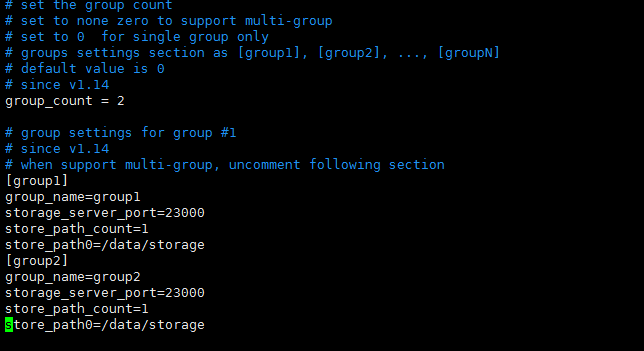
第一组Storage的mod_fastdfs.conf修改配置如下:
|
1 2 3 4 5 6 7 8 9 10 11 12 13 14 15 16 17 18 19 20 21 22 23 24 25 26 27 28 29 30 31 32 33 34 35 36 37 38 39 40 41 42 43 44 45 46 |
描述:2个节点中,同一组的配置应该是相同的。172.18.0.6,172.18.0.8为 一组,和172.18.0.7,172.18.0.9为一组。 #我有4台机器 分成了2个组, #(第一组:172.18.0.6,172.18.0.8) 配置如下: connect_timeout=10 tracker_server=172.18.0.4:22122 tracker_server=172.18.0.5:22122 storage_server_port=23000 url_have_group_name = true store_path0=/data/storage group_name=group1 #第一组为group_name=group1 第二组为group_name=group2 group_count=2 #在最后添加 [group1] 和 [group2] 如果只有一组就添加group1就行了 [group1] group_name=group1 storage_server_port=23000 store_path_count=1 store_path0=/data/storage [group2] group_name=group2 storage_server_port=23000 store_path_count=1 store_path0=/data/storage #include http.conf #第二组机器直接复制第一组机器配置文件 只需修改group_name即可(第二组:172.18.0.6,172.18.0.8) connect_timeout=10 tracker_server=172.18.0.4:22122 tracker_server=172.18.0.5:22122 storage_server_port=23000 url_have_group_name = true store_path0=/data/storage group_name=group2 #第一组为group_name=group1 第二组为group_name=group2 group_count=2 #在最后添加 [group1] 和 [group2] [group1] group_name=group1 storage_server_port=23000 store_path_count=1 store_path0=/data/storage [group2] group_name=group2 storage_server_port=23000 store_path_count=1 store_path0=/data/storage #include http.conf |
使用scp 命令将这个修改的配置文件复制到其他节点上
命令:scp mod_fastdfs.conf ip:/etc/fdfs/
|
1 2 3 4 5 |
说明:第一组Storage的mod_fastdfs.conf配置与第二组配置只有group_name不同: group_name=group2 #复制FastDFS的部分配置文件到/etc/fdfs目录 cp /opt/fastdfs/fastdfs-5.11/conf/http.conf /etc/fdfs/ cp /opt/fastdfs/fastdfs-5.11/conf/mime.types /etc/fdfs/ |
在/fastdfs/storage文件存储目录下创建软连接,将其链接到实际存放数据的目录(4台机器都要执行)
|
1 |
ln -s /data/storage/data/ /data/storage/data/M00 |
配置Nginx,简洁版nginx配置样例:
|
1 2 3 4 5 6 7 8 9 10 11 12 13 14 |
vim /usr/local/nginx/conf/nginx.conf server { listen 8081; server_name localhost; location ~/group([0-9])/M00 { alias /data/storage/data; ngx_fastdfs_module; } error_page 500 502 503 504 /50x.html; location = /50x.html { root html; } } |
|
1 2 3 4 5 6 7 |
注意、说明: 1.8081端口值是要与/etc/fdfs/storage.conf中的http.server_port=8081 相对应,因为http.server_port默认为8888,如果想改成8081,则要对应修改过来。 2.Storage对应有多个group的情况下,访问路径带group名,如/group1/M00/00/00/xxx,对应的Nginx配置为: location ~/group([0-9])/M00 { ngx_fastdfs_module; } 3.如查下载时如发现老报404,将nginx.conf第一行user nobody修改为user root后重新启动 |
启动Nginx(4台机器都要启动,最好设置成开机启动)
|
1 2 3 4 5 6 7 |
nginx /usr/local/nginx/sbin/nginx 设置Nginx开机启动 vim /etc/rc.local 加入 /usr/local/nginx/sbin/nginx |


防火墙中打开Nginx的8081端口
|
1 2 3 4 5 |
vim /etc/sysconfig/iptables -A INPUT -m state --state NEW -m tcp -p tcp --dport 8081 -j ACCEPT #重启防火墙 service iptables restart |
再次在tracker跟踪机上client上传个文件
|
1 2 |
使用上传命令: /usr/bin/fdfs_upload_file /etc/fdfs/client.conf [图片路径文件] |
在storage机器通过下载访问测试时上传的文件(自行测试)
|
1 2 |
wget http://172.18.0.6:8081/group1/M00/00/00/rBIABl3qzpCAYtNfAAAv2HqROxk.tar.gz wget http://172.18.0.7:8081/group1/M00/00/00/rBIABl3qzpCAYtNfAAAv2HqROxk.tar.gz |
———————————————————————————————————
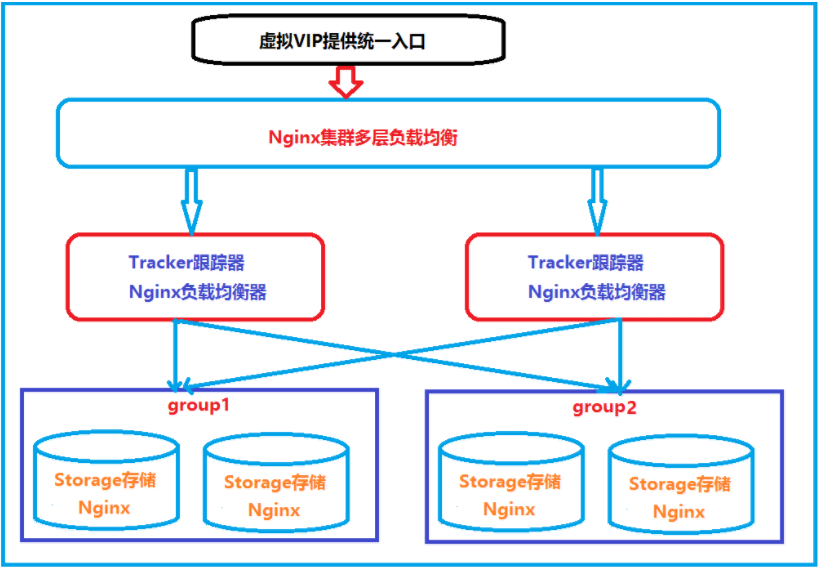
在跟踪器Tracker(172.18.0.4、172.18.0.5)上安装Nginx的 ngx_cache_purge(2台都要安装)
在跟踪器tracker上安装的nginx主要为了提供http访问的反向代理、负载均衡以及缓存服务。
|
1 2 3 4 5 |
wget http://nginx.org/download/nginx-1.13.10.tar.gz wget http://labs.frickle.com/files/ngx_cache_purge-2.3.tar.gz cd nginx-1.13.10 ./configure --prefix=/usr/local/nginx --add-module=/usr/local/src/ngx_cache_purge |
配置Nginx,设置负载均衡以及缓存
|
1 2 3 4 5 6 7 8 9 10 11 12 13 14 15 16 17 18 19 20 21 22 23 24 25 26 27 28 29 30 31 32 33 34 35 36 37 38 39 40 41 42 43 44 45 46 47 48 49 50 51 52 53 54 55 56 57 58 59 60 61 62 63 64 65 66 67 68 69 70 71 72 73 74 75 76 77 78 79 80 81 82 83 84 85 86 87 88 89 90 91 92 93 94 95 96 97 98 99 100 101 102 103 |
user root; worker_processes 1; #error_log logs/error.log; #error_log logs/error.log notice; #error_log logs/error.log info; #pid logs/nginx.pid; events { worker_connections 1024; use epoll; } http { include mime.types; default_type application/octet-stream; #log_format main '$remote_addr - $remote_user [$time_local] "$request" ' # '$status $body_bytes_sent "$http_referer" ' # '"$http_user_agent" "$http_x_forwarded_for"'; #access_log logs/access.log main; sendfile on; tcp_nopush on; #keepalive_timeout 0; keepalive_timeout 65; #gzip on; #设置缓存 server_names_hash_bucket_size 128; client_header_buffer_size 32k; large_client_header_buffers 4 32k; client_max_body_size 300m; proxy_redirect off; proxy_set_header Host $http_host; proxy_set_header X-Real-IP $remote_addr; proxy_set_header X-Forwarded-For $proxy_add_x_forwarded_for; proxy_connect_timeout 90; proxy_send_timeout 90; proxy_read_timeout 90; proxy_buffer_size 16k; proxy_buffers 4 64k; proxy_busy_buffers_size 128k; proxy_temp_file_write_size 128k; #设置缓存存储路径、存储方式、分配内存大小、磁盘最大空间、缓存期限 proxy_cache_path /fastdfs/cache/nginx/proxy_cache levels=1:2 keys_zone=http-cache:200m max_size=1g inactive=30d; proxy_temp_path /fastdfs/cache/nginx/proxy_cache/tmp; #设置group1的服务器 upstream fdfs_group1 { server 192.168.0.231:8888 weight=1 max_fails=2 fail_timeout=30s; server 192.168.0.232:8888 weight=1 max_fails=2 fail_timeout=30s; } #设置group2的服务器 upstream fdfs_group2 { server 192.168.0.233:8888 weight=1 max_fails=2 fail_timeout=30s; server 192.168.0.234:8888 weight=1 max_fails=2 fail_timeout=30s; } server { listen 8000; server_name localhost; #charset koi8-r; #access_log logs/host.access.log main; #设置group的负载均衡参数 location /group1/M00 { proxy_next_upstream http_502 http_504 error timeout invalid_header; proxy_cache http-cache; proxy_cache_valid 200 304 12h; proxy_cache_key $uri$is_args$args; proxy_pass http://fdfs_group1; expires 30d; } location /group2/M00 { proxy_next_upstream http_502 http_504 error timeout invalid_header; proxy_cache http-cache; proxy_cache_valid 200 304 12h; proxy_cache_key $uri$is_args$args; proxy_pass http://fdfs_group2; expires 30d; } #设置清除缓存的访问权限 location ~/purge(/.*) { allow 127.0.0.1; proxy_cache_purge http-cache $1$is_args$args; } #error_page 404 /404.html; # redirect server error pages to the static page /50x.html # error_page 500 502 503 504 /50x.html; location = /50x.html { root html; } } } |
|
1 2 3 |
按以上nginx配置文件的要求,创建对应的缓存目录: mkdir -p /fastdfs/cache/nginx/proxy_cache mkdir -p /fastdfs/cache/nginx/proxy_cache/tmp |

系统防火墙打开对应的端口
|
1 2 3 4 5 6 |
vi /etc/sysconfig/iptables -A INPUT -m state --state NEW -m tcp -p tcp --dport 8000 -j ACCEPT #重启防火墙 service iptables restart |
启动Nginx
|
1 2 3 4 5 6 |
/usr/local/nginx/sbin/nginx 重启Nginx /usr/local/nginx/sbin/nginx -s reload 设置Nginx开机启动 vim /etc/rc.local /usr/local/nginx/sbin/nginx |
文件访问测试
|
1 2 3 4 5 6 7 8 9 10 |
前面直接通过访问Storage节点中的Nginx的文件 http://172.18.0.6:8081/group1/M00/00/00/rBIABl3qzpCAYtNfAAAv2HqROxk.tar.gz http://172.18.0.7:8081/group2/M00/00/00/rBIABl3qzpCAYtNfAAAv2HqROxk.tar.gz 现在可以通过Tracker中的Nginx来进行下载文件访问 (1)通过Tracker1中的Nginx来访问 http://172.18.0.4:8082/group1/M00/00/00/rBIABl3qzpCAYtNfAAAv2HqROxk.tar.gz http://172.18.0.4:8082/group2/M00/00/00/rBIABl3qzpCAYtNfAAAv2HqROxk.tar.gz (2)通过Tracker2中的Nginx来访问 http://172.18.0.5:8082/group1/M00/00/00/rBIABl3qzpCAYtNfAAAv2HqROxk.tar.gz http://172.18.0.5:8082/group2/M00/00/00/rBIABl3qzpCAYtNfAAAv2HqROxk.tar.gz |
|
1 2 |
由上面的文件访问效果可以看到,每一个Tracker中的Nginx都单独对后端的Storage组做了负载均衡,但整套FastDFS集群如果想对外提供统一的文件访问地址,还需要对两个Tracker中的Nginx进行HA集群。 |
五:使用Keepalived + Nginx组成的高可用负载均衡集群做两个Tracker节点中Nginx的负载均衡(172.18.0.2,172.18.0.3)
关于keepalived+nginx的安装 请看这里 传送门
在Keepalived+Nginx实现高可用负载均衡集群中配置Tracker节点中Nginx的负载均衡反向代理(172.18.0.2和172.18.0.3中的Nginx执行相同的配置,你也可以装在tracker机器上都行)
vim /usr/local/nginx/conf/nginx.conf
|
1 2 3 4 5 6 7 8 9 10 11 12 13 14 15 16 17 18 19 20 21 22 23 24 25 26 27 28 29 30 31 32 33 34 35 36 37 38 39 40 41 42 43 44 45 46 47 48 49 50 51 52 53 54 55 56 57 58 59 60 61 62 63 64 65 66 67 68 |
#user nobody; worker_processes 1; #error_log logs/error.log; #error_log logs/error.log notice; #error_log logs/error.log info; #pid logs/nginx.pid; events { worker_connections 1024; } http { include mime.types; default_type application/octet-stream; #log_format main '$remote_addr - $remote_user [$time_local] "$request" ' # '$status $body_bytes_sent "$http_referer" ' # '"$http_user_agent" "$http_x_forwarded_for"'; #access_log logs/access.log main; sendfile on; #tcp_nopush on; #keepalive_timeout 0; keepalive_timeout 65; #gzip on; ## FastDFS Tracker Proxy upstream fastdfs_tracker { server 172.18.0.4:8082 weight=1 max_fails=2 fail_timeout=30s; server 172.18.0.5:8082 weight=1 max_fails=2 fail_timeout=30s; } server { listen 80; server_name localhost; #charset koi8-r; #access_log logs/host.access.log main; location / { root html; index index.html index.htm; } #error_page 404 /404.html; # redirect server error pages to the static page /50x.html error_page 500 502 503 504 /50x.html; location = /50x.html { root html; } ## FastDFS Proxy location /dfs { root html; index index.html index.htm; proxy_pass http://fastdfs_tracker/; proxy_set_header Host $http_host; proxy_set_header Cookie $http_cookie; proxy_set_header X-Real-IP $remote_addr; proxy_set_header X-Forwarded-For $proxy_add_x_forwarded_for; proxy_set_header X-Forwarded-Proto $scheme; client_max_body_size 300m; } } } |
重启172.18.0.2和 172.18.0.3的Nginx
|
1 2 3 4 5 |
/usr/local/nginx/sbin/nginx -s reload 然后通过keepalived的虚拟ip VIP(172.18.0.17)来访问 wget http://172.18.0.17/dfs/group1/M00/00/00/rBIABl3qzpCAYtNfAAAv2HqROxk.tar.gz wget http://172.18.0.17/dfs/group2/M00/00/00/rBIABl3qzpCAYtNfAAAv2HqROxk.tar.gz |

到此整个过程已完结,整个配置起来要细心。不是很难,但是不能马虎。
- 本文固定链接: https://www.yoyoask.com/?p=513
- 转载请注明: shooter 于 SHOOTER 发表