mysql主从复制,mycat配置 传送门
一.HAproxy安装
|
1 2 3 4 5 6 7 8 9 10 11 12 13 14 15 16 17 18 |
#gcc 安装 yum install gcc-c++ yum install haproxy (推荐,方便) #下载 wget http://fossies.org/linux/misc/haproxy-1.6.9.tar.gz #解压 tar -zxvf haproxy-1.6.9.tar.gz cd haproxy-1.6.9 #安装 make TARGET=linux2628 ARCH=x86_64 PREFIX=/usr/local/haproxy make install PREFIX=/usr/local/haproxy #参数说明 TARGET=linux26 #内核版本,使用uname -r查看内核,如:2.6.18-371.el5,此时该参数就为linux26;kernel大于2.6.28的用:TARGET=linux2628 ARCH=x86_64 #系统位数 PREFIX=/usr/local/haprpxy #/usr/local/haprpxy为haprpxy安装路径 |
二、创建配置文件
|
1 |
vim /usr/local/haproxy/haproxy.cfg |
|
1 2 3 4 5 6 7 8 9 10 11 12 13 14 15 16 17 18 19 20 21 22 23 24 25 26 27 28 29 30 31 32 33 34 35 36 37 38 39 40 41 42 43 44 45 46 47 48 49 50 51 52 |
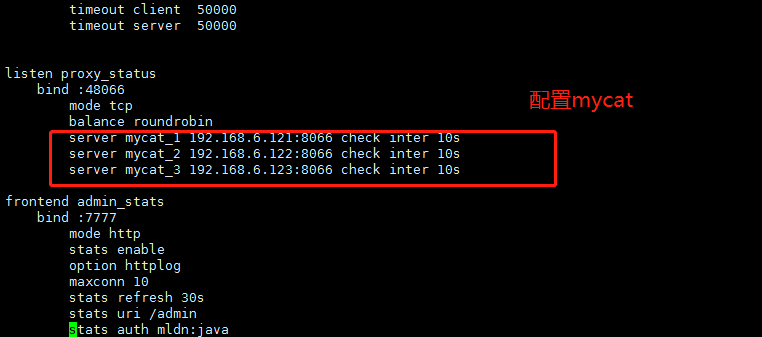
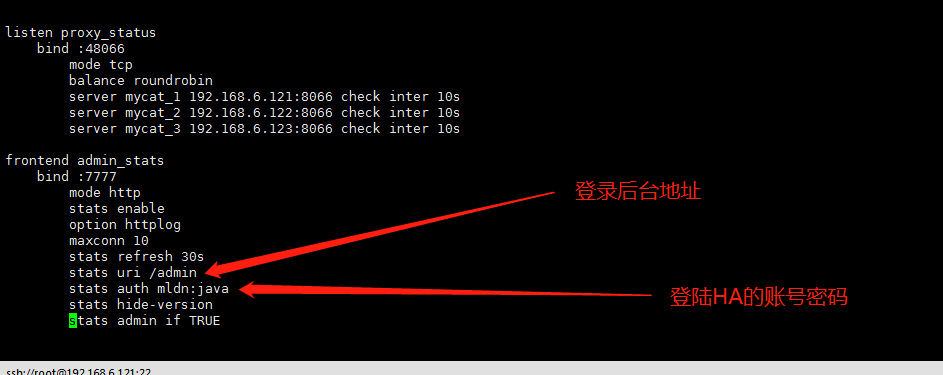
global log 127.0.0.1 local0 #log 127.0.0.1 local1 notice #log loghost local0 info maxconn 4096 chroot /usr/local/haproxy pidfile /usr/data/haproxy/haproxy.pid uid 99 gid 99 daemon #debug #quiet defaults log global mode tcp option abortonclose option redispatch retries 3 maxconn 2000 timeout connect 5000 timeout client 50000 timeout server 50000 listen proxy_status bind :48066 mode tcp balance roundrobin server mycat_1 192.168.6.121:8066 check inter 10s server mycat_2 192.168.6.122:8066 check inter 10s server mycat_3 192.168.6.123:8066 check inter 10s listen proxy_k8s bind :80 mode tcp balance roundrobin server k8s-master1 192.168.188.202:30001 check inter 10s server k8s-master2 192.168.188.203:30001 check inter 10s server k8s-master3 192.168.188.204:30001 check inter 10s frontend admin_stats bind :7777 mode http stats enable option httplog maxconn 10 stats refresh 30s stats uri /admin stats auth mldn:java stats hide-version stats admin if TRUE |
配置文件说明:
|
1 2 3 4 5 6 7 8 9 10 11 12 13 14 15 16 17 18 19 20 21 |
haproxy的配置文件 haproxy.cfg 的 默认地址:/etc/haproxy/haproxy.cfg haproxy.cfg 由两大部分组成,分别是 global 和 proxies 部分。 global:全局配置: 进程及安全配置相关的参数 性能调整相关参数 Debug参数 chroot # 锁定运行目录 deamon # 以守护进程运行 stats socket /var/lib/haproxy/haproxy.sock mode 600 level admin # socket文件 user, group, uid, gid # 运行haproxy的用户身份 nbproc # 开启的haproxy进程数,与CPU保持一致 nbthread # 指定每个haproxy进程开启的线程数,默认为每个进程一个线程 cpu-map 1 0 # 绑定haproxy 进程至指定CPU maxconn # 每个haproxy进程的最大并发连接数 maxsslconn # 每个haproxy进程ssl最大连接数,用于haproxy配置了证书的场景下 maxconnrate # 每个进程每秒创建的最大连接数量 spread-checks # 后端server状态check随机提前或延迟百分比时间,建议2-5(20%-50%)之间 pidfile # 指定pid文件路径 log 127.0.0.1 local3 info # 定义全局的syslog服务器;最多可以定义两个 |
|
1 2 3 4 5 |
proxies:代理配置 defaults:为 frontend, backend, listen提供默认配置 frontend:前端,相当于 nginx 中的 server {} backend:后端,相当于 nginx 中的 upstream {} listen:同时拥有 前端和后端配置 |
|
1 2 3 4 5 |
名称说明: - frontend 端(front end):指定接收 客户端 侦听套接字设置。 - backend 端(back end):指定将连接请求转发至 后端服务器 的相关设置。 - listen 端:指定完整的前后端设置,只对TCP有效 。 - proxy 名称:使用字母 、数字 - 、_ 、. 、: ,并区分字符大小写。 |
proxies配置-frontend 配置参数
|
1 2 3 4 5 6 7 8 9 10 11 12 13 14 15 16 17 18 19 20 21 22 23 24 25 26 27 28 29 30 31 32 33 34 35 36 37 38 39 40 41 42 43 44 45 46 47 48 49 50 51 52 53 54 55 56 57 58 59 60 61 62 63 64 65 66 67 68 69 70 71 72 73 74 75 76 77 78 79 80 81 82 83 84 85 86 87 88 89 90 91 92 93 94 95 96 97 98 99 100 101 102 103 104 105 106 107 108 109 110 111 112 113 114 115 116 117 118 119 |
#################### 监控页面的设置 ####################### listen admin_status # Frontend 和Backend 的组合体,监控组的名称,按需自定义名称 bind 0.0.0.0:65532 # 监听端口 mode http # http的7层网络模式 log 127.0.0.1 local3 err # 错误日志记录 stats refresh 5s # 每隔5秒自动刷新监控页面 stats uri /admin?stats # 监控页面的url stats realm itnihao\ itnihao # 监控页面的提示信息是 it ni hao stats auth admin:admin # 监控页面的用户和密码admin。可以设置多个用户名,如下所示 stats auth admin1:admin1 # 监控页面的用户和密码 admin1 stats hide-version # 隐藏统计页面上的 HAproxy版本信息 stats admin if TRUE # 手工启用/禁用,后端服务器(haproxy-1.4.9以后版本) errorfile 403 /etc/haproxy/errorfiles/403.http errorfile 500 /etc/haproxy/errorfiles/500.http errorfile 502 /etc/haproxy/errorfiles/502.http errorfile 503 /etc/haproxy/errorfiles/503.http errorfile 504 /etc/haproxy/errorfiles/504.http ################# HAProxy 的日志记录内容设置 ################### capture request header Host len 40 capture request header Content-Length len 10 capture request header Referer len 200 capture response header Server len 40 capture response header Content-Length len 10 capture response header Cache-Control len 8 ####################### 网站监测 listen 配置 ##################### ########### 此用法主要是监控 haproxy 后端服务器的监控状态 listen site_status bind 0.0.0.0:1081 # 监听端口 mode http # http的7层模式 log 127.0.0.1 local3 err # [err warning info debug] monitor-uri /site_status # 网站健康检测URL,用来检测HAProxy管理的网站是否可以用,正常返回200,不正常返回503 acl site_dead nbsrv(server_web) lt 2 # 定义网站down时的策略当挂在负载均衡上的指定backend的中有效机器数小于2台时返回true acl site_dead nbsrv(server_blog) lt 2 acl site_dead nbsrv(server_bbs) lt 2 monitor fail if site_dead # 当满足策略的时候返回503,网上文档说的是500,实际测试为503 monitor-net 192.168.16.2/32 # 来自192.168.16.2的日志信息不会被记录和转发 monitor-net 192.168.16.3/32 ####################### frontend配置 ################################ ##### 注意,frontend 配置里面可以定义多个 acl 进行匹配操作 frontend http_80_in bind 0.0.0.0:80 # 监听端口,即 haproxy 提供web服务的端口,和 lvs 的vip端口类似 mode http # http的7层模式 log global # 应用全局的日志配置 option httplog # 启用http的log option httpclose # 每次请求完毕后主动关闭 http 通道,HA-Proxy不支持keep-alive模式 option forwardfor # 如果后端服务器需要获得客户端的真实IP需要配置次参数,将可以从 Http Header 中获得客户端IP ######################## acl 策略配置 acl itnihao_web hdr_reg(host) -i ^(www.itnihao.cn|ww1.itnihao.cn)$ # 如果请求的域名满足正则表达式中的2个域名返回true -i是忽略大小写 acl itnihao_blog hdr_dom(host) -i blog.itnihao.cn # 如果请求的域名满足 www.itnihao.cn 返回true, -i 是忽略大小写 # acl itnihao hdr(host) -i itnihao.cn # 如果请求的域名满足 itnihao.cn 返回true, -i是忽略大小写 # acl file_req url_sub -i killall= # 在请求url中包 含killall= ,则此控制策略返回true,否则为false # acl dir_req url_dir -i allow # 在请求url中存在allow作为部分地址路径,则此控制策略返回true,否则返回false # acl missing_cl hdr_cnt(Content-length) eq 0 # 当请求的header中Content-length等于0时返回true ######################## acl策略匹配相应 # block if missing_cl # 当请求中header中Content-length等于0阻止请求返回403 # block if !file_req || dir_req # block表示阻止请求,返回403错误,当前表示如果不满足策略file_req,或者满足策略dir_req,则阻止请求 use_backend server_web if itnihao_web # 当满足 itnihao_web的策略时使用server_web的backend use_backend server_blog if itnihao_blog # 当满足 itnihao_blog 的策略时使用 server_blog的backend # redirect prefix http://blog.itniaho.cn code 301 if itnihao # 当访问 itnihao.cn 的时候,用 http 的 301 挑转到 http://192.168.16.3 default_backend server_bbs ### 以上都不满足的时候使用默认 server_bbs 的 backend ######################### backend的设置 ######################## ### 下面我将设置三组服务器 server_web,server_blog,server_bbs ############### backend server_web ############## backend server_web mode http # http的7层模式 balance roundrobin # 负载均衡的方式,roundrobin平均方式 cookie SERVERID # 会话保持 允许插入serverid到cookie中,serverid后面可以定义 option httpchk GET /index.html # 心跳检测的文件 server web1 192.168.16.2:80 cookie web1 check inter 1500 rise 3 fall 3 weight 1 server web2 192.168.16.3:80 cookie web2 check inter 1500 rise 3 fall 3 weight 2 # server web2 192.168.16.3:80 表示 服务器定义, # cookie web2 表示 serverid为web2, # check inter 1500 表示 检测心跳频率, # rise 3 表示 3次正确认为服务器可用, # fall 3 表示 3次失败认为服务器不可用, # weight 2 表示 权重 ################ backend server_blog ########### backend server_blog mode http # http 模式 balance roundrobin # 负载均衡的方式,roundrobin 轮询 cookie SERVERID # 允许插入serverid 到 cookie中,serverid 后面可以定义 option httpchk GET /index.html # 心跳检测的文件 server blog1 192.168.16.2:80 cookie blog1 check inter 1500 rise 3 fall 3 weight 1 server blog2 192.168.16.3:80 cookie blog2 check inter 1500 rise 3 fall 3 weight 2 ################ backend server_bbs ######### backend server_bbs mode http # http的7层模式 balance roundrobin # 负载均衡的方式,roundrobin 轮询 cookie SERVERID # 允许插入 serverid 到 cookie 中,serverid 后面可以定义 option httpchk GET /index.html # 心跳检测的文件 server bbs1 192.168.16.2:80 cookie bbs1 check inter 1500 rise 3 fall 3 weight 1 server bbs2 192.168.16.3:80 cookie bbs2 check inter 1500 rise 3 fall 3 weight 2 |
创建一个haproxy的数据保存路径:mkdir -p /usr/data/haproxy/
三、启动haproxy
|
1 |
/usr/local/haproxy/sbin/haproxy -f /usr/local/haproxy/haproxy.cfg |
四、查看状态
|
1 |
ps -ef|grep haproxy |

|
1 2 3 4 5 6 7 8 9 |
http://192.168.6.121:7777/admin http://192.168.6.122:7777/admin http://192.168.6.123:7777/admin (三台机器都要如上安装haproxy) #说明: 7777即haproxy.cfg配置文件中监听端口 /admin 即haproxy的访问路径 用户名:mldn 密码:java |
haproxy启动脚本
|
1 |
vim /etc/init.d/haproxy |
|
1 2 3 4 5 6 7 8 9 10 11 12 13 14 15 16 17 18 19 20 21 22 23 24 25 26 27 28 29 30 31 32 33 34 35 36 37 38 39 40 41 42 43 44 45 46 47 48 49 50 51 52 53 54 55 56 57 58 59 60 61 62 63 64 65 66 67 68 69 70 71 72 73 74 75 76 77 78 79 80 81 82 83 84 85 86 87 88 89 90 91 92 93 94 95 96 97 98 99 100 101 102 103 104 105 106 107 108 109 110 |
#!/bin/bash # # haproxy # # chkconfig: 35 85 15 # description: HAProxy is a free, very fast and reliable solution \ # offering high availability, load balancing, and \ # proxying for TCP and HTTP-based applications # processname: haproxy # config: /etc/haproxy.cfg # pidfile: /var/run/haproxy.pid # Source function library. . /etc/rc.d/init.d/functions # Source networking configuration. . /etc/sysconfig/network # Check that networking is up. [ "$NETWORKING" = "no" ] && exit 0 config="/usr/local/haproxy/haproxy.cfg" exec="/usr/local/haproxy/sbin/haproxy" prog=$(basename $exec) [ -e /etc/sysconfig/$prog ] && . /etc/sysconfig/$prog lockfile=/var/lock/subsys/haproxy check() { $exec -c -V -f $config } start() { $exec -c -q -f $config if [ $? -ne 0 ]; then echo "Errors in configuration file, check with $prog check." return 1 fi echo -n $"Starting $prog: " # start it up here, usually something like "daemon $exec" daemon $exec -D -f $config -p /var/run/$prog.pid retval=$? echo [ $retval -eq 0 ] && touch $lockfile return $retval } stop() { echo -n $"Stopping $prog: " # stop it here, often "killproc $prog" killproc $prog retval=$? echo [ $retval -eq 0 ] && rm -f $lockfile return $retval } restart() { $exec -c -q -f $config if [ $? -ne 0 ]; then echo "Errors in configuration file, check with $prog check." return 1 fi stop start } reload() { $exec -c -q -f $config if [ $? -ne 0 ]; then echo "Errors in configuration file, check with $prog check." return 1 fi echo -n $"Reloading $prog: " $exec -D -f $config -p /var/run/$prog.pid -sf $(cat /var/run/$prog.pid) retval=$? echo return $retval } force_reload() { restart } fdr_status() { status $prog } case "$1" in start|stop|restart|reload) $1 ;; force-reload) force_reload ;; checkconfig) check ;; status) fdr_status ;; condrestart|try-restart) [ ! -f $lockfile ] || restart ;; *) echo $"Usage: $0 {start|stop|status|checkconfig|restart|try-restart|reload|force-reload}" exit 2 esac |
|
1 2 3 4 5 6 7 8 |
chmod +x /etc/init.d/haproxy /etc/init.d/haproxy start|stop|restart #设置haproxy开机启动 systemctl enable haproxy #设置开机自动启动 systemctl disable haproxy #取消开机自动启动 chkconfig --list #查看开机启动列表 |
关于HAproxy设置日志 请看这里 这个人写的很好,我这里就不重复了 传送门
keepalive安装与配置
|
1 2 3 4 5 6 7 8 9 10 11 12 13 14 15 16 17 18 19 20 21 22 |
#第一步,安装基础库 yum -y install openssl-devel libnl3-develipset-devel iptables-devel libnfnetlink-devel net-snmp-devel #第二步,下载源码安装 wget http://www.keepalived.org/software/keepalived-1.2.13.tar.gz tar zxvf keepalived-1.2.13.tar.gz cd keepalived-1.2.13 ./configure --prefix=/usr/local/keepalived/ make make install cp /usr/local/keepalived/etc/rc.d/init.d/keepalived /etc/init.d/keepalived cp /usr/local/keepalived/sbin/keepalived /usr/sbin/ cp /usr/local/keepalived/etc/sysconfig/keepalived /etc/sysconfig/ mkdir -p /etc/keepalived/ cp /usr/local/keepalived/etc/keepalived/keepalived.conf /etc/keepalived/keepalived.conf #将keepalived添加到开机启动服务中,并进行测试 chkconfig keepalived on chkconfig --list | grep keepalived #启动 /etc/init.d/keepalived start 或者 /usr/local/keepalived/sbin/keepalived -f /etc/keepalived/keepalived.conf-D |
1.配置 keepalive haproxy检测脚本
|
1 2 3 4 5 6 7 8 9 10 11 |
#!/bin/sh PATH=/bin:/sbin:/usr/bin:/usr/sbin A=`ps -C haproxy --no-header |wc -l` if [ $A -eq 0 ] then echo 'haproxy server is died' killall keepalived fi |
注意,有些机器可能没有killall命令,需要安装
|
1 |
yum -y install psmisc |
配置在/opt/.local/check_haproxy_alive.sh 下(这个看个人喜好)
chmod +x /opt/.local/check_haproxy_alive.sh #添加执行权限,下面keepalived配置文件要用到
2.配置(192.168.6.121) node1 的 keepalive
|
1 2 3 4 5 6 7 8 9 10 11 12 13 14 15 16 17 18 19 20 21 22 23 24 25 26 27 28 |
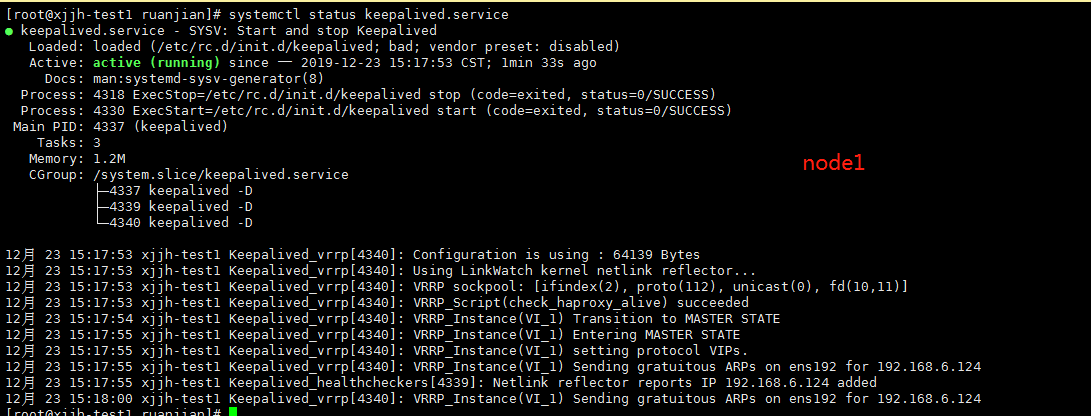
! Configuration File for keepalived vrrp_script check_haproxy_alive { script "/opt/.local/check_haproxy_alive.sh" #运行脚本,脚本内容上面有,就是起到一个nginx宕机以后,自动结束掉keepalived服务, interval 3 #检测时间间隔 weight -10 #如果条件成立的话,则权重 -10 } global_defs { router_id LVS_DEVEL } vrrp_instance VI_1 {##定义虚拟路由, VI_1 为虚拟路由的标示符,自己定义名称 state MASTER ##设置节点node1为master 主分支 角色 interface ens192 ##绑定虚拟 IP 的网络接口,与本机IP地址所在的网络接口相同 mcast_src_ip 192.168.6.121 ## 本机 IP 地址 virtual_router_id 51 #虚拟路由的ID号,两个节点设置必须一样 priority 100 ##节点优先级,值范围 0-254, MASTER 要比 BACKUP 高 advert_int 1 ## 组播信息发送间隔,两个节点设置必须一样, 默认 1s authentication { ### 设置验证信息,两个节点必须一致 auth_type PASS auth_pass 1111 } #将 track_script 块加入 instance 配置块 track_script { check_haproxy_alive #执行 Nginx 监控的服务 } virtual_ipaddress { ##提供给Tomcat应用的虚拟服务地址 192.168.6.120 ## 虚拟 ip,可以定义多个 } } |
端口映射(根据自己需求):
|
1 2 3 4 5 6 7 8 9 10 11 12 13 14 15 16 17 18 19 20 |
virtual_server 192.168.200.100 0 {# 虚拟服务器地址 IP 对外提供服务的端口 0代表所有端口 delay_loop 6 # 健康检查时长 单位秒 lb_algo rr # 负载均衡算法 rr|wrr|lc|wlc|lblc|sh|dh:LVS调度算法 lb_kind NAT # 负载均衡转发规则,一般用dr,nat调度器会有瓶颈问题 persistence_timeout 50 # http服务会话时长 单位秒 protocol TCP # TCP|UDP|SCTP:4层协议 real_server 192.168.201.100 443 { # 真实的对外提供服务的地址跟IP weight 1 # 权重 权重越高转发优先级越高 SSL_GET { # HTTP_GET | SSL_GET | TCP_CHECK url { path /index.html digest e93e7f6cfbc7c343707f21e2f681dd31 } connect_timeout 3 # 服务连接端口 nb_get_retry 3 # 服务连接失败重试次数 delay_before_retry 3 # 重试连接间隔 单位 秒 } } } |
|
1 2 3 4 5 6 7 8 9 10 11 12 13 14 15 16 17 18 |
virtual_server 192.168.188.204 0 { delay_loop 3 lb_algo wrr lb_kind DR persistence_timeout 50 protocol TCP real_server 192.168.188.204 0 { weight 1 TCP_CHECK { connect_timeout 3 nb_get_retry 3 delay_before_retry 3 connect_port 6443 } } } |
3.配置(192.168.6.122) node2的keepalive
|
1 2 3 4 5 6 7 8 9 10 11 12 13 14 15 16 17 18 19 20 21 22 23 24 25 26 27 |
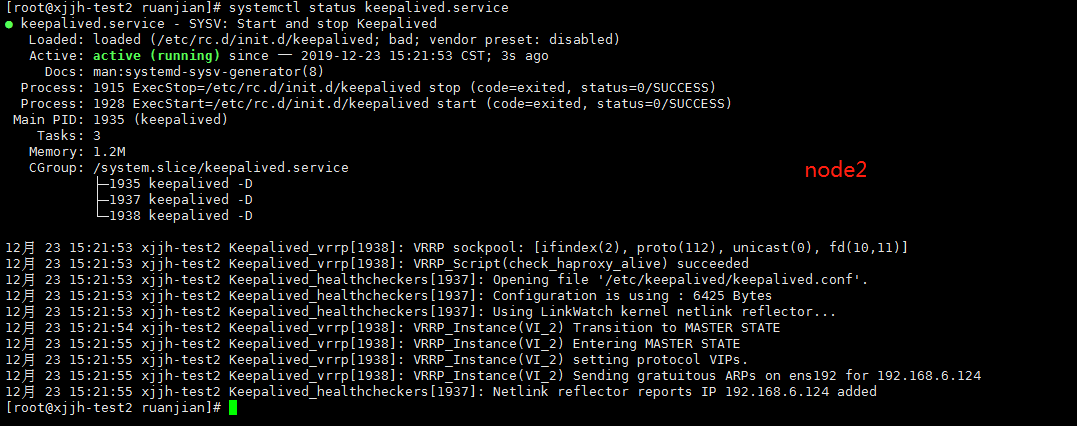
! Configuration File for keepalived vrrp_script check_haproxy_alive { script "/opt/.local/check_haproxy_alive.sh" interval 3 weight -10 } global_defs { router_id LVS_DEVEL } vrrp_instance VI_2 { state BACKUP interface ens192 mcast_src_ip 192.168.6.122 virtual_router_id 51 priority 50 advert_int 1 authentication { auth_type PASS auth_pass 1111 } track_script { check_haproxy_alive } virtual_ipaddress { 192.168.6.120 } } |
4.配置(192.168.6.123) node3的keepalive
|
1 2 3 4 5 6 7 8 9 10 11 12 13 14 15 16 17 18 19 20 21 22 23 24 25 26 27 |
! Configuration File for keepalived vrrp_script check_haproxy_alive { script "/opt/.local/check_haproxy_alive.sh" interval 3 weight -10 } global_defs { router_id LVS_DEVEL } vrrp_instance VI_3 { state BACKUP interface ens192 mcast_src_ip 192.168.6.123 virtual_router_id 51 priority 30 advert_int 1 authentication { auth_type PASS auth_pass 1111 } track_script { check_haproxy_alive } virtual_ipaddress { 192.168.6.120 } } |
配置好后重新启动keepalive
|
1 2 |
systemctl daemon-reload #重新加载keepalived配置文件 systemctl restart keepalived.service #重新启动 |
|
1 2 3 4 5 6 7 8 9 |
#多种启动方法 启动 keepalive systemctl start keepalived systemctl enable keepalived #设置开机自启动 /etc/init.d/keepalived start /usr/local/keepalived/sbin/keepalived -f /etc/keepalived/keepalived.conf-D |
查看三台机器是否正常启动
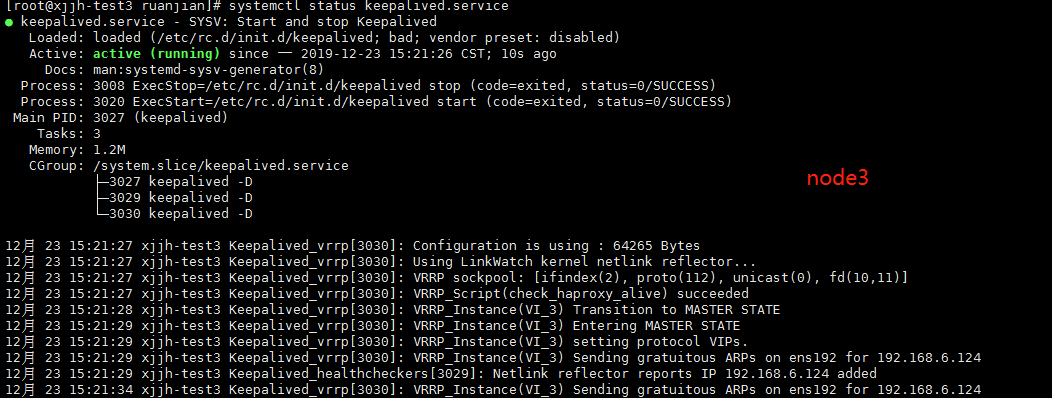
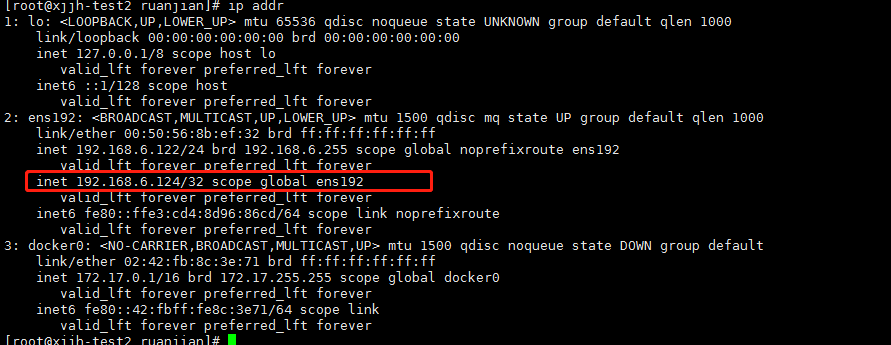
5.查看虚拟ip 是否已经绑定到ens192
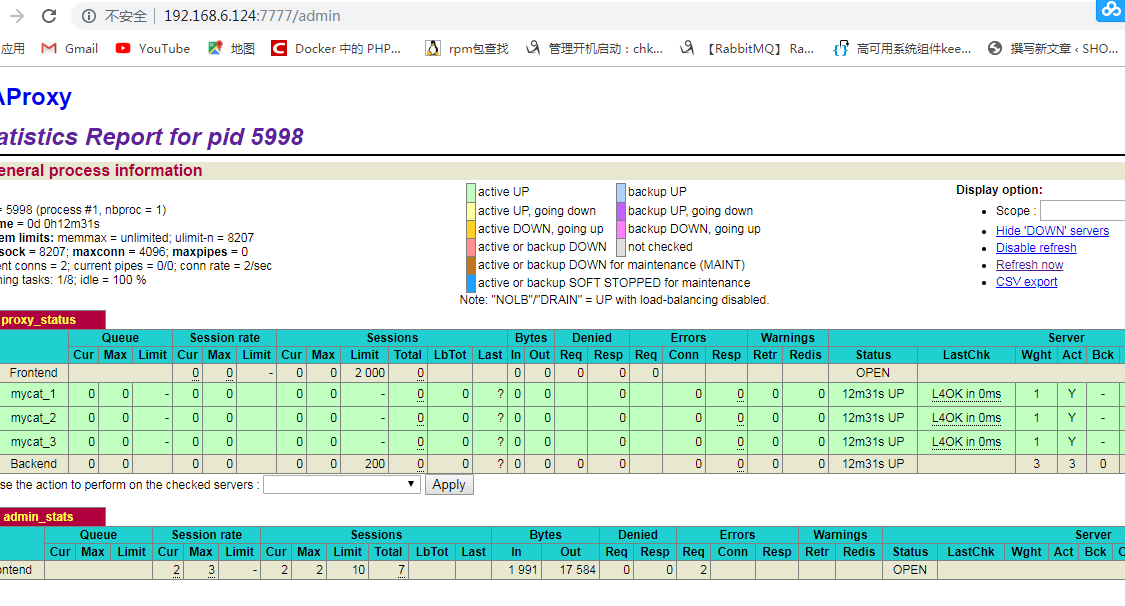
6.验证访问
分别修改 haproxy 账号密码(通过密码不同来区分keepalive访问的哪台机器HA后台)
|
1 2 3 |
node1 :admin1 111111 node2 :admin2 222222 node3 : admin3 333333 |


设置完成后重新启动下HA(三个节点都要重启)
|
1 2 3 |
ps -ef|grep haproxy kill -9 [id] |
先来通过vip 访问下HA后台(默认应该指向的node1,因为node1是keepalive的主节点master,其他2个都是BACKUP)

模拟node1故障(关闭node1 HA)
|
1 2 |
ps -ef|grep haproxy kill -9 xxx |

访问:关闭掉node1节点后,再次访问 http://192.168.6.124:7777/admin 会再次提示你输入账号密码,因为主机器已经切换到了第二台,或者三台
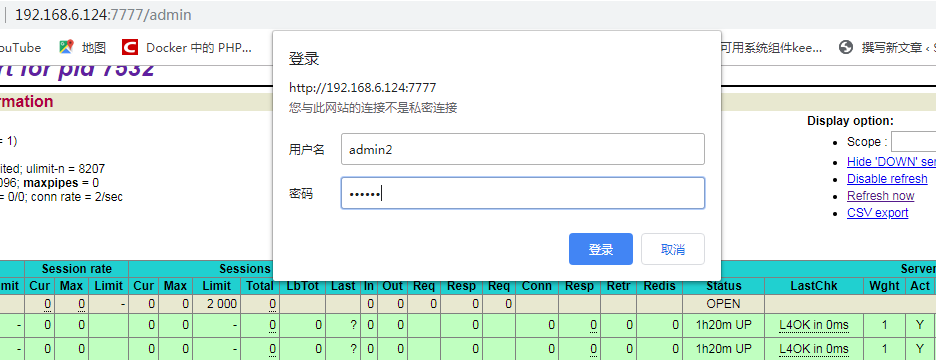
输入第二台或者第三台的密码登录成功,这样就证明keepalive已经成功了!
提示:测试的时候最好关闭你的防火墙,因为会出幺蛾子,可能是虚拟ip不存在的原因吧
- 本文固定链接: https://www.yoyoask.com/?p=1028
- 转载请注明: shooter 于 SHOOTER 发表