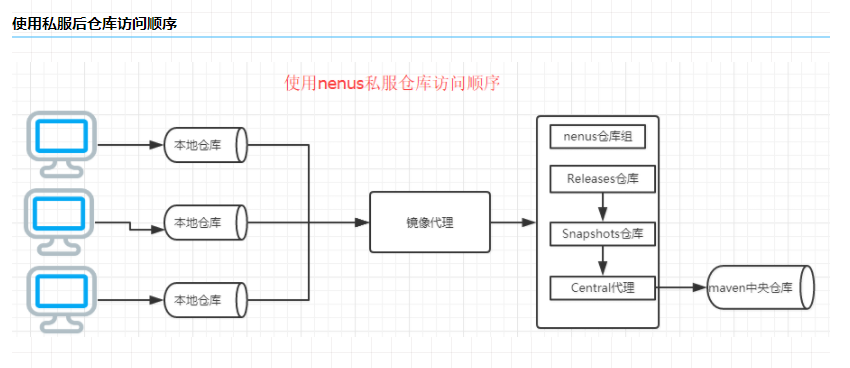
1.配置从nexus私服下载第三方jar包(有三种方式)
1.1 方式一(pom.xml的方式)
|
1 2 3 4 5 6 7 8 9 10 11 12 13 14 15 16 17 18 19 20 21 22 23 24 25 26 27 |
<repositories> <!-- 配置nexus远程仓库 --> <repository> <id>nexus</id><!--这里如果在pom里设置,需要设置对于的账号密码--> <name>Nexus Snapshot Repository</name> <url>http://192.168.66.178:8081/repository/maven-public/</url> <releases> <enabled>true</enabled> </releases> <snapshots> <enabled>false</enabled> </snapshots> </repository> </repositories> <!-- 配置从哪个仓库中下载构件,即jar包 --> <pluginRepositories> <pluginRepository> <id>nexus</id> <name>Nexus Snapshot Repository</name> <url>http://192.168.66.178:8081/repository/maven-public/</url> <releases> <enabled>true</enabled> </releases> <snapshots> <enabled>false</enabled> </snapshots> </pluginRepository> |
|
1 2 3 4 5 6 7 8 9 |
由于nexus私服需要有用户名和密码登录才能访问,需要在maven settings.xml文件中servers选项中,加入如下内容 <server> <id>nexus</id><!--上面mirror镜像仓库秘钥--> <username>admin</username> <password>123</password> </server> #注意上面的server->id的值和pom.xml中repository->id的值一致,通过这个id关联找到凭证的。 |
|
1 2 |
但是在pom文件中的配置仅对当前项目有效,但若需在其他项目中使用,为避免代码重复性,减少冗余,可在maven软件的conf/settings.xml文件中配置。本文也选用的是setting文件配置nexus仓库。 在setting.xml文件中不存在repositories、pluginRepositories标签,而选择使用profile,具体配置可参考以下第二种配置方式。 |
2. 方式二镜像模式mirror (本文选择第二种)
maven settings.xml文件中配置
|
1 2 3 4 5 6 7 8 9 10 11 12 |
<mirrors> <mirror> <!--该镜像的唯一标识符。id用来区分不同的mirror元素。 --> <id>maven-public</id> <!--这里也需要在servier里设置对于密码--> <!--镜像名称 --> <name>maven-public</name> <!--*指的是访问任何仓库都使用我们的私服--> <mirrorOf>*</mirrorOf> <!--该镜像的URL。构建系统会优先考虑使用该URL,而非使用默认的服务器URL。 --> <url>http://192.168.66.178:8081/repository/maven-public/</url> </mirror> </mirrors> |
当然对应的server,账号密码,也需要配置
|
1 2 3 4 5 6 |
<server> <id>maven-public</id> <username>admin</username> <password>123</password> </server> #注意上面的server->id的值和mirror->id的值需要一致,这样才能找到对应的凭证。 |
3. 方式三 profile
添加一组profile配置,配置了私有仓库和插件仓库地址(同方式一一个意思)
|
1 2 3 4 5 6 7 8 9 10 11 12 13 14 15 16 17 18 19 |
<profile> <id>development</id> <repositories><!-- 配置nexus远程仓库 --> <repository> <id>public</id> <url>http://192.168.66.178:8081/repository/maven-public/</url> <releases><enabled>true</enabled></releases> <snapshots><enabled>true</enabled></snapshots> </repository> </repositories> <pluginRepositories><!-- 配置插件仓库从哪个仓库中下载构件,即jar包 --> <pluginRepository> <id>public</id> <url>http://192.168.66.178:8081/repository/maven-public/</url> <releases><enabled>true</enabled></releases> <snapshots><enabled>true</enabled></snapshots> </pluginRepository> </pluginRepositories> </profile> |
|
1 |
这个方式也不知道要不要再server里设置账号密码,暂未测试。测试完补全记录 |
pom与setting区别:方式一只针对单个项目有效,方式二,方式三针对所有项目有效
3.1、激活profile( 在<settings></settings>之间加入下面的配置,激活使用上面的仓库配置 )
|
1 2 3 |
<activeProfiles> <activeProfile>development</activeProfile> </activeProfiles> |
5.部署构件到nexus仓库(将jar发送到nexus私服务器)
|
1 |
在项目的pom.xml中最后,复制如下配置配置,可以有多个distributionManagement标签 |
|
1 2 3 4 5 6 7 8 9 10 11 12 13 14 15 |
<!--发布项目到Nexus,配置上传到私服--> <distributionManagement> <repository> <!--id的名字可以任意取,但是在setting文件中的属性<server>的ID与这里一致--> <id>releases</id> <name>Releases</name> <!--指向仓库类型为host(宿主仓库)的储存类型为Release的仓库--> <url>http://192.168.60.133:8081/repository/maven-releases/</url> </repository> <snapshotRepository> <id>snapshots</id> <name>Snapshot</name> <url>http://192.168.60.133:8081/repository/maven-snapshots/</url> </snapshotRepository> </distributionManagement> |
在maven 的 setting.xml文件中添加认证信息
|
1 2 3 4 5 6 7 8 9 10 11 12 13 14 15 16 17 |
<servers> <server> <id>maven-public</id><!--上面mirror镜像仓库秘钥--> <username>admin</username> <password>123</password> </server> <server> <id>releases</id> <username>admin</username> <password>123</password> </server> <server> <id>snapshots</id> <username>admin</username> <password>123</password> </server> </servers> |
|
1 |
注意:repository 里的 id 需要和上一步里的 server id (releases)名称保持一致 |
6. 执行部署
|
1 2 3 4 5 |
<dependency> <groupId>log4j</groupId> <artifactId>log4j</artifactId> <version>1.2.14</version> </dependency> |
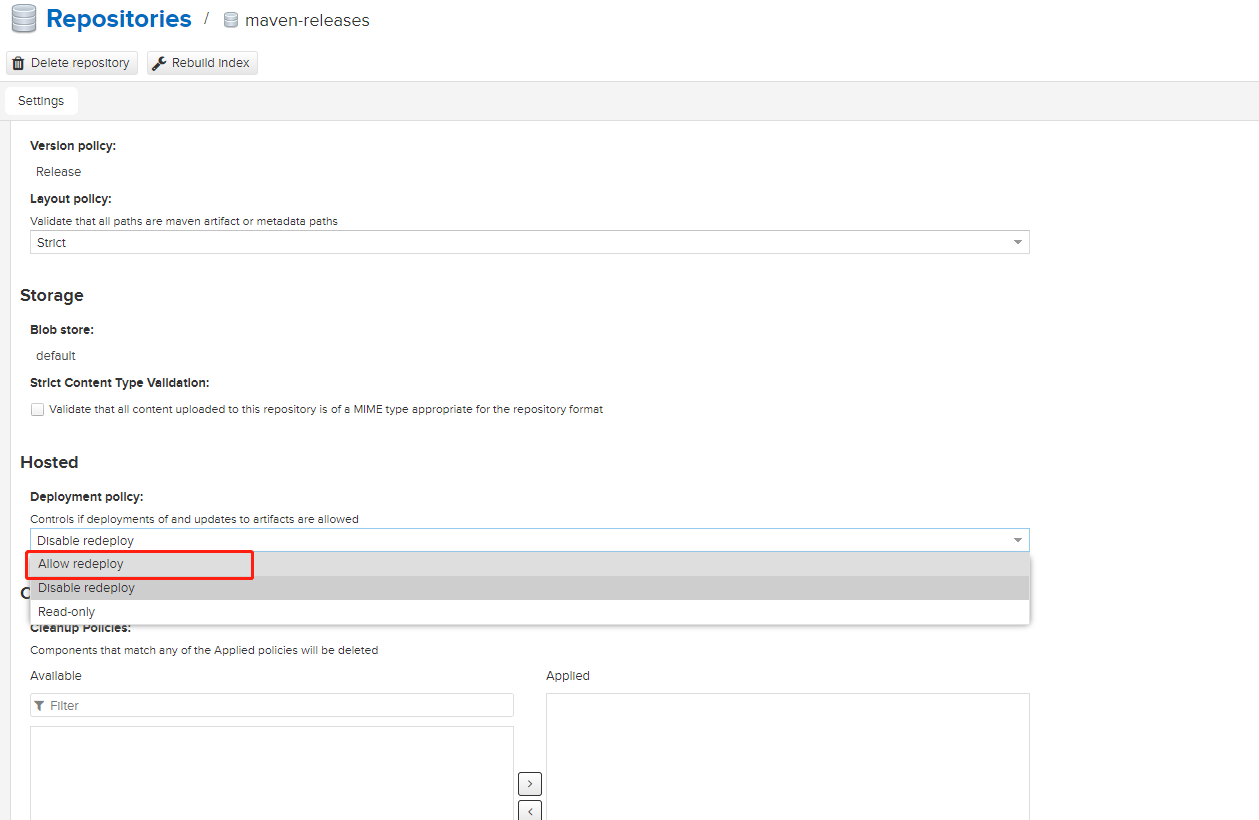
7. 还有修改maven-releases 仓库配置(这里记得改成Allow redeploy)
|
1 2 3 4 |
deployment pollcy有三个值: read-only: 只读 disable redeploy: 读和部署 allow redeploy: 读, 部署, 删除 |
8. 在命令行中执行: mvn clean deploy
|
1 2 3 4 5 6 7 8 9 |
如果之前没用执行过该命令,maven会自动到中央仓库中下载部署所需的插件。最后在命令行中看到如下所示就代表构件已经部署成功。 注意: 1.这里只有Snapshot的仓库上传成功,Release仓库并没有上传成功,这是因为版本号名称结尾有SNAPSHOT,默认以这个结尾是不会上传到Release仓库去的,去除就会上传到Release仓库且不会上传到快照仓库 2.Release仓库默认不支持重复发布,可配置 3.注意setting中server标签下的id要和pom文件中仓库配置的id相同,即指定上传到哪个仓库 |
|
1 |
到此nexus的releases仓库中即可查看刚刚部署好的构件信息。 |
其他:
|
1 2 3 4 5 6 7 8 9 |
#也可使用如下命令来构建 mvn deploy:deploy-file \ -DgroupId=<group-id> \ -DartifactId=<artifact-id> \ -Dversion=<version> \ -Dpackaging=<type-of-packaging> \ -Dfile=<path-to-file> \ -DrepositoryId=<server-id-settings.xml> \ -Durl=<url-of-the-repository-to-deploy> |
|
1 2 3 4 5 |
执行前先把.m2仓库删除,因为默认已经下载到.m2仓库,执行命令默认会找m2仓库,如果m2仓库有,就不去私服下载 rm -rf /root/.m2/ 执行 mvn clear 把上次构建清掉 |
带源码发布的插件配置,在pom.xml中添加以下内容:
|
1 2 3 4 5 6 7 8 9 10 11 12 13 14 15 16 17 18 |
<build> <plugins> <!-- 发布源码,需要这个插件 --> <plugin> <groupId>org.apache.maven.plugins</groupId> <artifactId>maven-source-plugin</artifactId> <version>3.0.1</version> <executions> <execution> <id>attach-sources</id> <goals> <goal>jar</goal> </goals> </execution> </executions> </plugin> </plugins> </build> |
|
1 2 |
#其他参考 https://www.bbsmax.com/A/kvJ3pE6w5g/ |
- 本文固定链接: https://www.yoyoask.com/?p=5441
- 转载请注明: shooter 于 SHOOTER 发表
这个作者貌似有点懒,什么都没有留下。