Redis单机服务最怕的是宕机了,一旦宕机,可能会导致系统不可用或导致其他一系列的问题。后来出现了redis集群,但是redis集群没有实现自动发现故障和对主从机器进行切换。
Redis Sentinel 是官方推荐的高可用性解决方案。它不会因为节点宕机而导致服务不可用,同时,它可以作为监控管理工具,可以提供节点监控、通知、自动故障恢复和客户端配置发现服务等,即使出现了故障,也能很快知道,并进行修复。
开始搭建:创建一个文件夹,用于适用docker-compose.yml文件
1.编写docker-compose
|
1 2 3 4 5 6 7 8 |
mkdir -p /opt/docker/{redis-1,redis-2,redis-3,sentinel} mkdir -p /opt/docker/redis/redis-1/data mkdir -p /opt/docker/redis/redis-2/data mkdir -p /opt/docker/redis/redis-3/data #docker network create redis_cluster #创建网络 #这里因为是在一个节点,最好是用host网络模式,否则哨兵返回ip为容器ip,远程是无法连接的 |
2.创建配置文件redis.conf
|
1 2 3 4 5 6 7 8 9 10 11 |
vim /opt/docker/redis/redis-1/redis.conf port 6379 vim /opt/docker/redis/redis-2/redis.conf port 6380 vim /opt/docker/redis/redis-3/redis.conf port 6381 |
redis-cluster.yaml
|
1 2 3 4 5 6 7 8 9 10 11 12 13 14 15 16 17 18 19 20 21 22 23 24 25 26 27 28 29 30 31 32 33 34 35 36 37 38 39 40 41 42 43 44 45 46 47 |
version: '3.7' services: master: image: redis container_name: redis-master restart: always #networks: # - "redis_cluster" network_mode: "host" command: redis-server --port 6379 --requirepass 123456 --masterauth 123456 --appendonly yes #ports: # - 6379:6379 volumes: - /opt/docker/redis/redis-1/data:/data - /opt/docker/redis-cluster/redis-1/redis.conf:/usr/local/etc/redis/redis.conf slave1: image: redis container_name: redis-slave-1 restart: always #networks: # - "redis_cluster" network_mode: "host" command: redis-server --slaveof 192.168.66.180 6379 --port 6380 --requirepass 123456 --masterauth 123456 --appendonly yes #ports: # - 6380:6380 volumes: - /opt/docker/redis/redis-2/data:/data - /opt/docker/redis-cluster/redis-2/redis.conf:/usr/local/etc/redis/redis.conf slave2: image: redis container_name: redis-slave-2 restart: always #networks: # - "redis_cluster" network_mode: "host" command: redis-server --slaveof 192.168.66.180 6379 --port 6381 --requirepass 123456 --masterauth 123456 --appendonly yes #ports: # - 6381:6381 volumes: - /opt/docker/redis/redis-3/data:/data - /opt/docker/redis-cluster/redis-3/redis.conf:/usr/local/etc/redis/redis.conf #networks: # redis_cluster: # external: true |
2. 启动redis,使用如下命令 -d 挂在后台
|
1 |
docker-compose -f redis-cluster.yaml up -d |

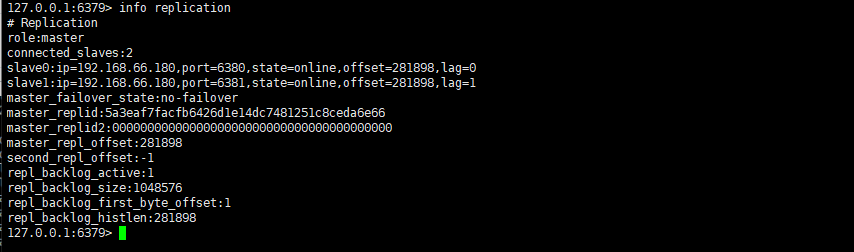
查看集群状态
|
1 |
info replication |
|
1 |
可以再去其他节点,get name看看是否主从同步正常 |
|
1 2 3 4 |
至此,redis一主二从完毕,如果想知道数据是否被持久化可以执行如下命令。查看是否有name这个key,有则表明数据持久化成功。 docker-compose -f [yaml] down docker-compose -f [yaml] up -d |
部署redis-sentinel
1.编写sentinel.conf
|
1 |
vim sentinel.conf |
|
1 2 3 4 5 6 7 8 9 |
port 26379 dir /tmp #自定义集群名mymaster,其中 192.168.66.180 为 redis-master的ip,6379为redis-master的端口,2 为最小投票数(因为有 3 台 Sentinel 所以可以设置成 2) sentinel monitor mymaster 192.168.66.180 6379 2 sentinel down-after-milliseconds mymaster 30000 sentinel parallel-syncs mymaster 1 sentinel auth-pass mymaster 123456 sentinel failover-timeout mymaster 180000 sentinel deny-scripts-reconfig yes |
|
1 2 3 4 |
#执行如下命令,复制3份redis-sentinel配置文件 cp sentinel.conf /opt/docker/redis/sentine/sentinel1.conf cp sentinel.conf /opt/docker/redis/sentine/sentinel2.conf cp sentinel.conf /opt/docker/redis/sentine/sentinel3.conf |
|
1 |
#注意: sentinel1.conf sentinel2.conf sentinel3.conf 端口分别为26379...26381 |
2.编写docker-compose.yml
|
1 2 3 4 5 6 7 8 9 10 11 12 13 14 15 16 17 18 19 20 21 22 23 24 25 26 27 28 29 30 31 32 33 34 35 36 37 38 39 40 41 42 43 |
version: '3.7' services: sentinel1: image: redis container_name: redis-sentinel-1 command: redis-sentinel /usr/local/etc/redis/sentinel.conf restart: always network_mode: "host" #networks: # - "redis_cluster" #ports: # - 26379:26379 volumes: - /opt/docker/redis/sentine/sentinel1.conf:/usr/local/etc/redis/sentinel.conf sentinel2: image: redis container_name: redis-sentinel-2 command: redis-sentinel /usr/local/etc/redis/sentinel.conf restart: always network_mode: "host" #networks: # - "redis_cluster" #ports: # - 26380:26379 volumes: - /opt/docker/redis/sentine/sentinel2.conf:/usr/local/etc/redis/sentinel.conf sentinel3: image: redis container_name: redis-sentinel-3 command: redis-sentinel /usr/local/etc/redis/sentinel.conf restart: always network_mode: "host" #networks: # - "redis_cluster" #ports: # - 26381:26379 volumes: - /opt/docker/redis/sentine/sentinel3.conf:/usr/local/etc/redis/sentinel.conf #networks: # redis_cluster: # external: true |
启动哨兵
|
1 |
docker-compose -f redis-sentinel.yaml up -d |
进入redis-sentinel容器中,查看redis连接状态
|
1 2 3 4 5 6 |
redis-cli -p 26379 #执行如下命令,查看redis主信息 sentinel master mymaster # 显示如下表明正常 |

执行如下命令,查看从redis信息是否正常
|
1 2 3 |
sentinel slaves mymaster # 显示如下表明正常 |

测试主redis挂了之后,哨兵能否正常选举redis
|
1 |
docker stop redis-master |

查看redis-sentinel日志,看其将那个redis选举为主,如下,其将端口位6381的redis选举为主

|
1 |
可以看到,6380端口的redis被选举为主了,测试端口号为6380的redis是否具备写功能,如下则表明成功 |

可写,表明故障转移成功!
<完>
如果容器需要资源限制请添加如下设置
|
1 |
limit用于限制最大的资源使用数量,reservation为最低的资源占用量。 |
|
1 2 3 4 5 6 7 8 |
deploy: resources: limits: cpus: '0.50' memory: 50M reservations: cpus: '0.25' memory: 20M |
- 本文固定链接: https://www.yoyoask.com/?p=6015
- 转载请注明: shooter 于 SHOOTER 发表
这个作者貌似有点懒,什么都没有留下。