管理kvm虚拟机
1.列出所有的虚拟机
|
1 |
virsh list --all |
2.显示虚拟机信息
|
1 |
virsh dominfo kvm-1 |
3.显示虚拟机内存和cpu的使用情况
|
1 2 |
yum install virt-top -y virt-top |
4.显示虚拟机分区信息
|
1 |
virt-df kvm-1 |
5.关闭虚拟机(shutodwn)
|
1 |
virsh shutdown kvm-1 |
5.强制关闭虚拟机
|
1 |
virsh destroy centos7-1 |
6.启动虚拟机
|
1 |
virsh start kvm-1 |
7.暂停虚拟机
|
1 |
virsh suspend kvm-1 |
8.继续虚拟机
|
1 |
virsh resume c1 |
7.设置虚拟机(kvm-1)跟随系统自启
|
1 |
virsh autostart kvm-1 |
8.关闭虚拟机及自启
|
1 |
virsh autostart --disable kvm-1 |
9.删除虚拟机
|
1 |
virsh undefine kvm-1 |
10.通过控制窗口登录虚拟机
|
1 |
virsh console kvm-1 |
11. 重命名虚拟机(域)
|
1 |
virsh domrename demo demo-01 |
kvm创建快照
1.查看虚拟机
|
1 2 3 4 |
jerrywang@lambda-1:~$ virsh list --all Id Name State ---------------------------------------------------- - k8s-master-01 shut off |
2.创建指定虚拟机快照
|
1 |
virsh snapshot-create-as k8s-master-01 k8s-master-01-20210421 |

3.查看快照
|
1 |
virsh snapshot-list k8s-master-01 |

4.恢复指定虚拟机快照
|
1 2 3 4 |
#关闭虚拟机 virsh shutdown k8s-master-01 #恢复快照 virsh snapshot-revert k8s-master-01 k8s-master-01-20210421 |
5.查看指定虚拟机快照文件位置
|
1 |
ls -l -h /var/lib/libvirt/qemu/snapshot/k8s-master-01/ |
6.删除指定虚拟机快照
|
1 |
virsh snapshot-delete k8s-master-01 k8s-master-01-20210421 |
给虚拟机增加网卡
|
1 2 3 |
virsh attach-interface server2008 –type bridge –source br0 其中server2008为要添加网卡的虚拟机,–type为要添加网卡的类型,–source为使用KVM服务器的那个网卡。 |
给虚拟机添加硬盘
1.添加硬盘(lvm卷)或者USB到虚拟机上
|
1 |
virsh attach-disk kvm-1 /dev/sdb vbd --driver qemu --mode shareable |
2.使用完成之后可以卸载usb
|
1 |
virsh detach-disk kvm vdb |
3.添加lvm卷,并挂载
|
1 2 3 4 5 6 7 8 |
磁盘分区->逻辑分区(lvm)->建立物理卷(pv)->建立卷组(vg)->分出逻辑卷(lv)。 然后挂载逻辑卷到机器 lvcreate -n xiaozidev02 -L 100G scvg #创建逻辑卷名字为xiaozidev02 ,scvg为卷组 挂载逻辑卷scvg到 kvm虚拟机 virsh attach-disk xiaozi-dev-02 /dev/scvg/xiaozidev02 vdb --driver qemu --mode shareable |

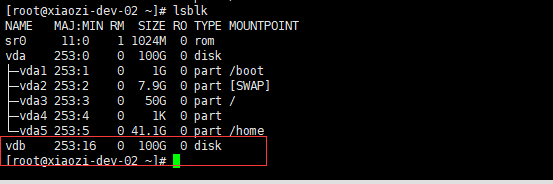
查看虚拟机是不是多了一块磁盘vdb
|
1 2 3 4 5 6 7 8 9 10 11 12 13 14 15 16 17 18 19 20 21 22 23 24 25 26 27 28 29 30 31 32 33 34 35 36 37 38 39 40 41 42 |
[root@sh-kvm-1 ~]# lvcreate -n kvm-1-data -L 50G vg_shkvm1 [root@sh-kvm-1 ~]# virsh attach-disk kvm-1 /dev/vg_shkvm1/kvm-1-data vdb --driver qemu --mode shareable Disk attached successfully # 登录到kvm-1上查看lvm是否已经被挂载 [root@sh-kvm-1 ~]# virsh console kvm-1 # 输入kvm-1的用户和密码 [root@sh-kvm-1-1 ~]# fdisk -l # 查看硬盘挂载情况 Disk /dev/vda: 21.5 GB, 21474836480 bytes 16 heads, 63 sectors/track, 41610 cylinders Units = cylinders of 1008 * 512 = 516096 bytes Sector size (logical/physical): 512 bytes / 512 bytes I/O size (minimum/optimal): 512 bytes / 512 bytes Disk identifier: 0x00058197 Device Boot Start End Blocks Id System /dev/vda1 * 3 1018 512000 83 Linux Partition 1 does not end on cylinder boundary. /dev/vda2 1018 41611 20458496 8e Linux LVM Partition 2 does not end on cylinder boundary. Disk /dev/mapper/VolGroup-lv_root: 18.8 GB, 18798870528 bytes 255 heads, 63 sectors/track, 2285 cylinders Units = cylinders of 16065 * 512 = 8225280 bytes Sector size (logical/physical): 512 bytes / 512 bytes I/O size (minimum/optimal): 512 bytes / 512 bytes Disk identifier: 0x00000000 Disk /dev/mapper/VolGroup-lv_swap: 2147 MB, 2147483648 bytes 255 heads, 63 sectors/track, 261 cylinders Units = cylinders of 16065 * 512 = 8225280 bytes Sector size (logical/physical): 512 bytes / 512 bytes I/O size (minimum/optimal): 512 bytes / 512 bytes Disk identifier: 0x00000000 Disk /dev/vdb: 53.7 GB, 53687091200 bytes # 新添加的硬盘 16 heads, 63 sectors/track, 104025 cylinders Units = cylinders of 1008 * 512 = 516096 bytes Sector size (logical/physical): 512 bytes / 512 bytes I/O size (minimum/optimal): 512 bytes / 512 bytes Disk identifier: 0x00000000 |
4.格式化新添加的vdb,并添加到lvm组中
|
1 2 3 4 5 6 7 8 9 10 11 12 13 14 15 16 17 18 19 20 21 22 23 24 25 26 27 28 29 30 31 32 33 34 35 36 37 38 39 40 41 42 43 44 45 46 47 48 49 50 51 52 53 54 55 56 57 58 59 60 61 62 63 64 65 66 67 68 69 70 71 72 73 74 75 76 77 78 79 80 81 82 |
# 对新添加的硬盘分区 [root@sh-kvm-1-1 ~]# fdisk /dev/vdb Device contains neither a valid DOS partition table, nor Sun, SGI or OSF disklabel Building a new DOS disklabel with disk identifier 0xf04b6807. Changes will remain in memory only, until you decide to write them. After that, of course, the previous content won't be recoverable. Warning: invalid flag 0x0000 of partition table 4 will be corrected by w(rite) WARNING: DOS-compatible mode is deprecated. It's strongly recommended to switch off the mode (command 'c') and change display units to sectors (command 'u'). Command (m for help): m # 查看帮助 Command action a toggle a bootable flag b edit bsd disklabel c toggle the dos compatibility flag d delete a partition l list known partition types m print this menu n add a new partition o create a new empty DOS partition table p print the partition table q quit without saving changes s create a new empty Sun disklabel t change a partition's system id u change display/entry units v verify the partition table w write table to disk and exit x extra functionality (experts only) Command (m for help): n #添加一个分区 Command action e extended p primary partition (1-4) p #选择添加一个扩展分区 Partition number (1-4): Value out of range. Partition number (1-4): 1 First cylinder (1-104025, default 1): Using default value 1 Last cylinder, +cylinders or +size{K,M,G} (1-104025, default 104025): Using default value 104025 Command (m for help): t #改变分区的格式 Selected partition 1 Hex code (type L to list codes): 8e #改成lvm Changed system type of partition 1 to 8e (Linux LVM) Command (m for help): w # 保存更改 root@sh-kvm-1-1 ~]# mkfs.ext4 /dev/vdb1 # 格式化分区 mke2fs 1.41.12 (17-May-2010) Filesystem label= OS type: Linux Block size=4096 (log=2) Fragment size=4096 (log=2) Stride=0 blocks, Stripe width=0 blocks 3276800 inodes, 13107142 blocks 655357 blocks (5.00%) reserved for the super user First data block=0 Maximum filesystem blocks=4294967296 400 block groups 32768 blocks per group, 32768 fragments per group 8192 inodes per group Superblock backups stored on blocks: 32768, 98304, 163840, 229376, 294912, 819200, 884736, 1605632, 2654208, 4096000, 7962624, 11239424 Writing inode tables: done Creating journal (32768 blocks): done Writing superblocks and filesystem accounting information: done This filesystem will be automatically checked every 28 mounts or 180 days, whichever comes first. Use tune2fs -c or -i to override. [root@sh-kvm-1-1 ~]# pvc reate /dev/vdb1 # 创建pv vdb vdb1 [root@sh-kvm-1-1 ~]# vgextend VolGroup /dev/vdb # 扩展lvm vg vdb vdb1 [root@sh-kvm-1-1 ~]# vgs VG #PV #LV #SN Attr VSize VFree VolGroup 2 2 0 wz--n- 69.50g 50.00g # 从上面能看出,新添加的 已经加到lvm组中 |
改变虚拟机的参数
通过命令行更改创建之后虚拟机的内存,cpu等信息
1.更改内存
|
1 2 3 4 5 6 7 8 9 10 11 12 13 14 15 16 17 18 19 20 21 22 23 24 25 26 27 28 |
# 1. 查看虚拟机当前内存 [root@sh-kvm-1 ~]# virsh dominfo kvm-1 | grep memory Max memory: 4194304 KiB Used memory: 4194304 KiB # 2、动态设置内存为512MB,内存减少 virsh setmem kvm-1 524288 # 注意单位必须是KB # 3、查看内存变化 # virsh dominfo kvm-1 | grep memory Max memory: 14194304 KiB Used memory: 524288 kiB # 4、内存增加 virsh shutdown kvm-1 virsh edit kvm-1 # 直接更改memory #修改内存 memory 和 currentMemory 参数来调整内存大小; 8G = 8388608 16G = 16777216 修改 CPU vcpu 参数来调整 CPU 个数(核数) #设置虚拟机从配置文件启动[同步修改到配置文件应该] virsh create /etc/libvirt/demu/kvm-1/xml # 之后操作1,2,3步骤增加内存 |
2.更改CPU
|
1 |
需要修改配置文件,因此需要停止虚拟机 |
|
1 2 3 4 |
virsh shutdown kvm-1 virsh edit kvm-1 # <vcpu>2</vcpu> # 4 > 2 virsh create /etc/libvirt/demu/kvm-1/xml |
热添加cpu
|
1 2 3 |
如果虚机有设置maxvcpu 上面得可以不用执行可以直接以下热添加cpu 得命令 热添加添加cpu个数,写入配置文件。永久保存 virsh setvcpus demo 2 --live --config |
3.重新定义使以上修改的配置生效(推荐)
|
1 |
virsh define /etc/libvirt/qemu/centos7.xml |
也可从配置文件启动
|
1 |
virsh create /etc/libvirt/demu/kvm-1/xml |
4.硬盘扩容
|
1 2 3 4 5 6 7 8 9 10 11 12 13 14 15 16 17 18 19 20 21 22 23 |
1. Create a 10-GB non-sparse file: # dd if=/dev/zero of=/vm-images/vm1-add.img bs=1M count=10240 2. Shutdown the VM: # virsh shutdown vm1 3. Add an extra entry for ‘disk’ in the VM's XML file in /etc/libvirt/qemu. You can look copy & paste the entry for your mail storage device and just change the target and address tags. For example: # virsh edit vm1 <disk type='file' device='disk'> <driver name='qemu' type='raw' cache='none' io='threads'/> <source file='/vm-images/vm1.img'/> <target dev='vda' bus='virtio'/> <address type='pci' domain='0x0000' bus='0x00' slot='0x04' function='0x0'/> </disk> Add: <disk type='file' device='disk'> <driver name='qemu' type='raw' cache='none' io='threads'/> <source file='/vm-images/vm1-add.img'/> <target dev='vdb' bus='virtio'/> <address type='pci' domain='0x0000' bus='0x00' slot='0x06' function='0x0'/> </disk> # 这里建议使用上面的添加硬盘的方式添加 |
删除虚拟机
1.第一步,停掉虚拟机
|
1 2 |
virsh shutdown kvm-1 |
2.第二步
|
1 |
virsh destroy kvm-1 |
3.第三步
|
1 |
virsh undefine kvm-1 |
4.第四步
|
1 |
rm /dev/vg_shkvm1/kvm-1 # 不建议删除硬盘 |
Qist kvm模板 地址
5. kvm 从快照恢复后,同步系统时间
|
1 2 3 4 5 6 7 8 9 10 11 12 |
# 安装并配置NTP/Chrony sudo apt install chrony -y # Ubuntu/Debian sudo yum install chrony -y # CentOS/RHEL # 启用时间同步服务 sudo timedatectl set-ntp true # 查看时间同步状态 timedatectl status #写入硬件时钟 hwclock --systohc |
- 本文固定链接: https://www.yoyoask.com/?p=4972
- 转载请注明: shooter 于 SHOOTER 发表
这个作者貌似有点懒,什么都没有留下。