[原理]
- 磁盘分区:建立标准分区(基本分区)(一般分2-3个区)
- 把基本分区变成物理卷,物理卷简称(PV)
- 再把物理卷组合成卷组(VG) [卷组是允许动态扩容的]
- 然后在卷组里边,再分成逻辑卷(LV) [同样逻辑卷允许动态扩容]
- 注:逻辑卷里的最小存储仓(PE)默认最小是1MB一格,有些系统默认是4MB,
注意:如果你是新安装电脑boot必须放在标准(普通)分区当中sda1,不可以使用LVM分区当中,否则系统崩溃
LVM分区基本流程图
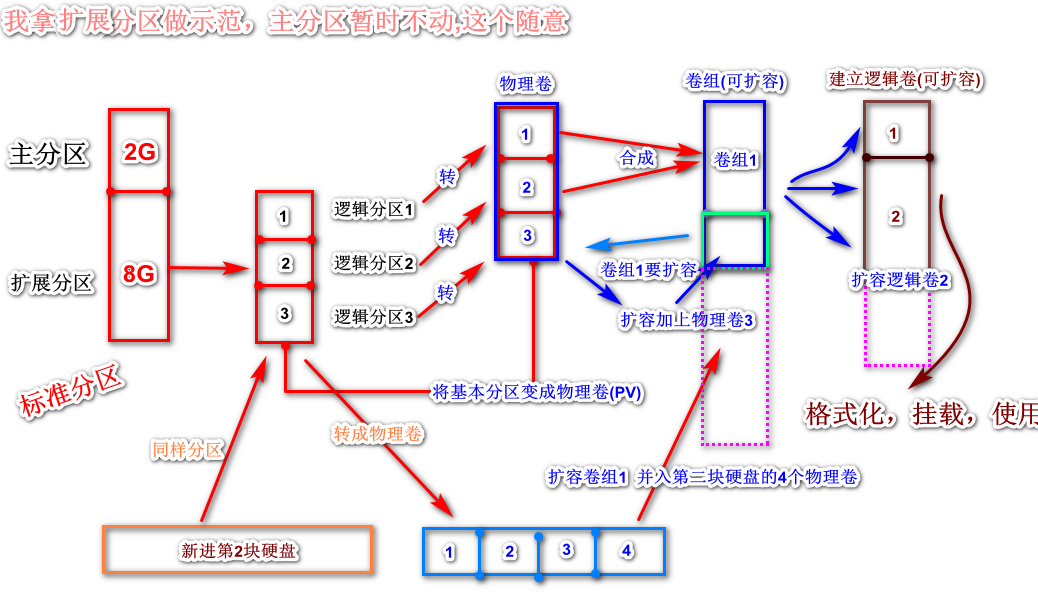
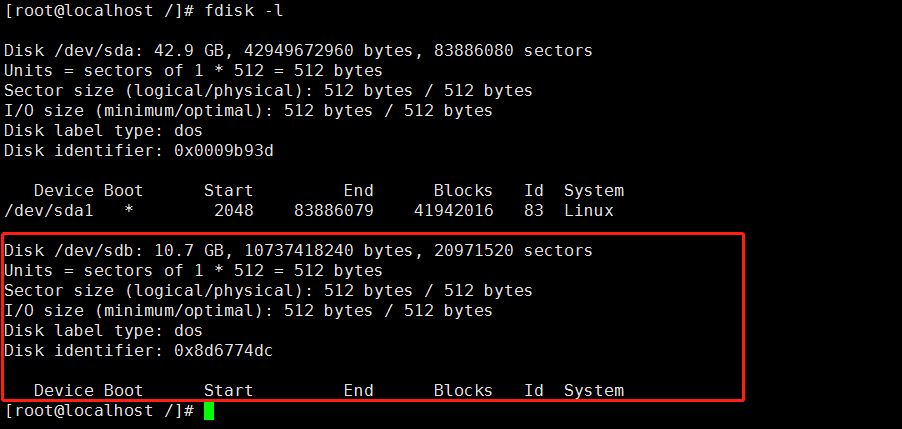
例:我新加进来一块10G的硬盘(虚拟机)
1.[基本分区]
|
1 2 3 4 5 6 7 8 9 10 11 12 13 14 15 16 17 18 19 20 21 22 23 24 25 26 27 28 29 30 31 32 33 34 35 36 37 38 39 40 41 42 43 44 45 46 47 48 49 50 51 52 53 |
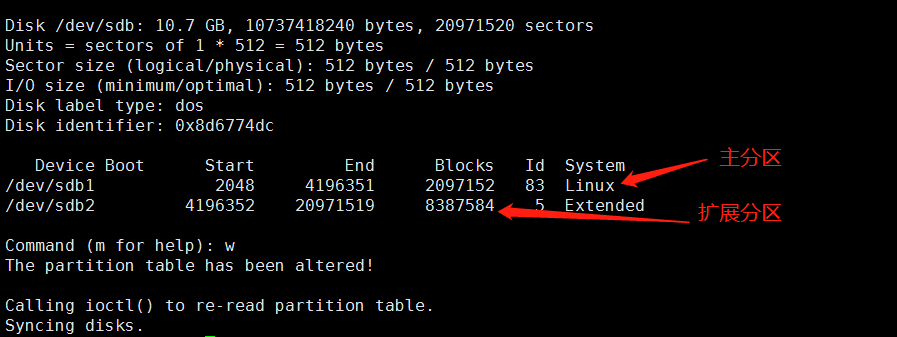
#我将这个10G的硬盘建立2个标准分区 1.主分区 2G 2.扩展分区 8G 下方为终端linux命令 ---------------------------------分割线---------------------------------- [root@localhost /]# fdisk /dev/sdb Welcome to fdisk (util-linux 2.23.2). Changes will remain in memory only, until you decide to write them. Be careful before using the write command. Command (m for help): n Partition type: p primary (0 primary, 0 extended, 4 free) e extended Select (default p): p Partition number (1-4, default 1): 1 First sector (2048-20971519, default 2048): Using default value 2048 Last sector, +sectors or +size{K,M,G} (2048-20971519, default 20971519): +2G Partition 1 of type Linux and of size 2 GiB is set Command (m for help): n Partition type: p primary (1 primary, 0 extended, 3 free) e extended Select (default p): e Partition number (2-4, default 2): 2 First sector (4196352-20971519, default 4196352): Using default value 4196352 Last sector, +sectors or +size{K,M,G} (4196352-20971519, default 20971519): Using default value 20971519 Partition 2 of type Extended and of size 8 GiB is set Command (m for help): p Disk /dev/sdb: 10.7 GB, 10737418240 bytes, 20971520 sectors Units = sectors of 1 * 512 = 512 bytes Sector size (logical/physical): 512 bytes / 512 bytes I/O size (minimum/optimal): 512 bytes / 512 bytes Disk label type: dos Disk identifier: 0x8d6774dc Device Boot Start End Blocks Id System /dev/sdb1 2048 4196351 2097152 83 Linux /dev/sdb2 4196352 20971519 8387584 5 Extended Command (m for help): w The partition table has been altered! Calling ioctl() to re-read partition table. Syncing disks. |
|
1 2 3 4 5 6 7 8 9 10 11 12 13 14 15 16 17 18 19 20 21 22 23 24 25 26 27 28 29 30 31 32 33 34 35 36 37 38 39 40 41 42 43 44 45 46 47 48 49 50 51 52 53 54 55 56 57 58 59 60 61 62 63 64 65 66 67 68 69 70 71 72 73 74 75 76 77 |
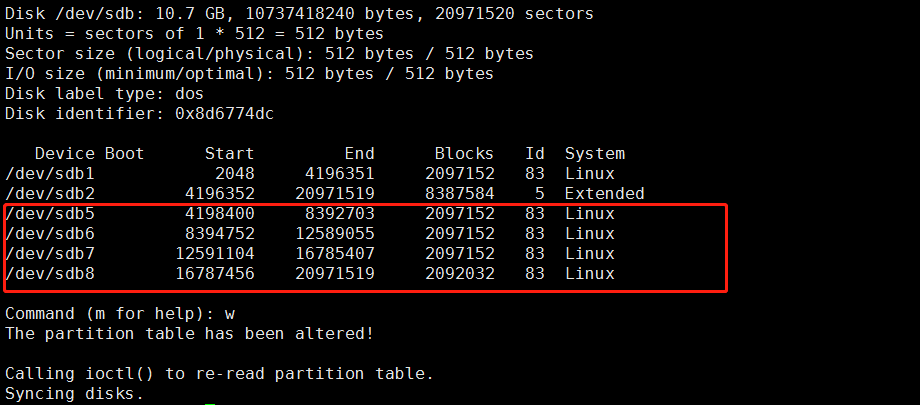
3.我将继续在扩展分区上建立4个逻辑分区,分别给与2G大小 [root@localhost /]# fdisk /dev/sdb Welcome to fdisk (util-linux 2.23.2). Changes will remain in memory only, until you decide to write them. Be careful before using the write command. Command (m for help): n Partition type: p primary (1 primary, 1 extended, 2 free) l logical (numbered from 5) Select (default p): l Adding logical partition 5 First sector (4198400-20971519, default 4198400): Using default value 4198400 Last sector, +sectors or +size{K,M,G} (4198400-20971519, default 20971519): +2G Partition 5 of type Linux and of size 2 GiB is set Command (m for help): n Partition type: p primary (1 primary, 1 extended, 2 free) l logical (numbered from 5) Select (default p): l Adding logical partition 6 First sector (8394752-20971519, default 8394752): Using default value 8394752 Last sector, +sectors or +size{K,M,G} (8394752-20971519, default 20971519): +2G Partition 6 of type Linux and of size 2 GiB is set Command (m for help): n Partition type: p primary (1 primary, 1 extended, 2 free) l logical (numbered from 5) Select (default p): l Adding logical partition 7 First sector (12591104-20971519, default 12591104): Using default value 12591104 Last sector, +sectors or +size{K,M,G} (12591104-20971519, default 20971519): +2G Partition 7 of type Linux and of size 2 GiB is set Command (m for help): n Partition type: p primary (1 primary, 1 extended, 2 free) l logical (numbered from 5) Select (default p): l Adding logical partition 8 First sector (16787456-20971519, default 16787456): Using default value 16787456 Last sector, +sectors or +size{K,M,G} (16787456-20971519, default 20971519): Using default value 20971519 Partition 8 of type Linux and of size 2 GiB is set Command (m for help): p Disk /dev/sdb: 10.7 GB, 10737418240 bytes, 20971520 sectors Units = sectors of 1 * 512 = 512 bytes Sector size (logical/physical): 512 bytes / 512 bytes I/O size (minimum/optimal): 512 bytes / 512 bytes Disk label type: dos Disk identifier: 0x8d6774dc Device Boot Start End Blocks Id System /dev/sdb1 2048 4196351 2097152 83 Linux /dev/sdb2 4196352 20971519 8387584 5 Extended /dev/sdb5 4198400 8392703 2097152 83 Linux /dev/sdb6 8394752 12589055 2097152 83 Linux /dev/sdb7 12591104 16785407 2097152 83 Linux /dev/sdb8 16787456 20971519 2092032 83 Linux Command (m for help): w The partition table has been altered! Calling ioctl() to re-read partition table. Syncing disks. |
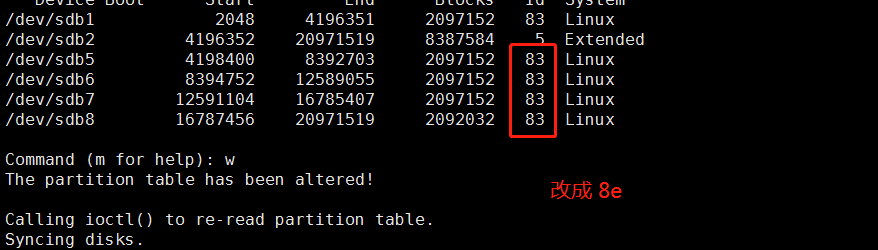
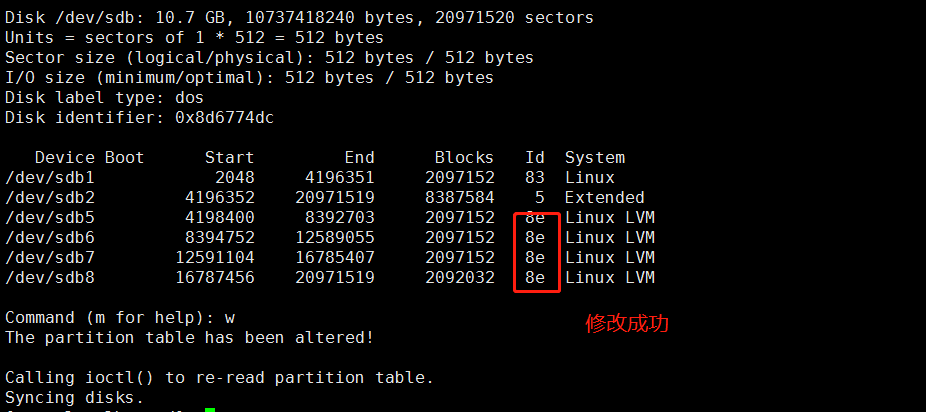
[注意点]: 分区的系统ID不再是系统默认的83了,需要改成LVM的ID号8e
|
1 2 3 4 5 6 7 8 9 10 11 12 13 14 15 16 17 18 19 20 21 22 23 24 25 26 27 28 29 30 31 32 33 34 35 36 37 38 39 40 41 42 43 44 45 46 47 48 49 50 51 52 53 |
修改分区系统ID终端命令: -----------------------------------分割线----------------------------------- [root@localhost /]# fdisk /dev/sdb Welcome to fdisk (util-linux 2.23.2). Changes will remain in memory only, until you decide to write them. Be careful before using the write command. Command (m for help): t Partition number (1,2,5-8, default 8): 5 Hex code (type L to list all codes): 8e Changed type of partition 'Linux' to 'Linux LVM' Command (m for help): t Partition number (1,2,5-8, default 8): 6 Hex code (type L to list all codes): 8e Changed type of partition 'Linux' to 'Linux LVM' Command (m for help): t Partition number (1,2,5-8, default 8): 7 Hex code (type L to list all codes): 8e Changed type of partition 'Linux' to 'Linux LVM' Command (m for help): t Partition number (1,2,5-8, default 8): 8 Hex code (type L to list all codes): 8e Changed type of partition 'Linux' to 'Linux LVM' Command (m for help): p Disk /dev/sdb: 10.7 GB, 10737418240 bytes, 20971520 sectors Units = sectors of 1 * 512 = 512 bytes Sector size (logical/physical): 512 bytes / 512 bytes I/O size (minimum/optimal): 512 bytes / 512 bytes Disk label type: dos Disk identifier: 0x8d6774dc Device Boot Start End Blocks Id System /dev/sdb1 2048 4196351 2097152 83 Linux /dev/sdb2 4196352 20971519 8387584 5 Extended /dev/sdb5 4198400 8392703 2097152 8e Linux LVM /dev/sdb6 8394752 12589055 2097152 8e Linux LVM /dev/sdb7 12591104 16785407 2097152 8e Linux LVM /dev/sdb8 16787456 20971519 2092032 8e Linux LVM Command (m for help): w The partition table has been altered! Calling ioctl() to re-read partition table. Syncing disks. |
[把基本分区变成物理卷(PV)]
|
1 2 3 4 5 |
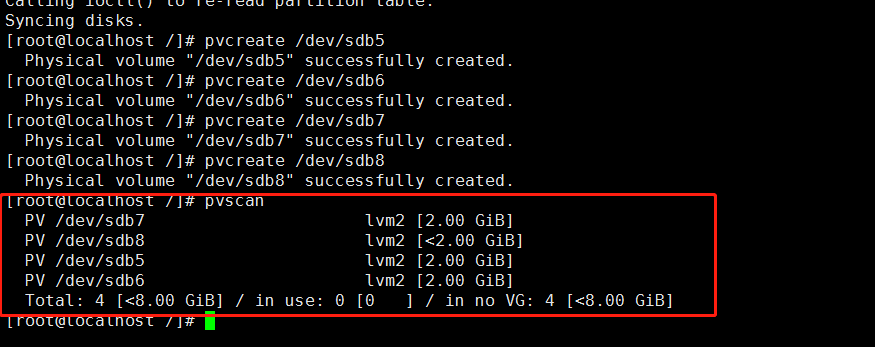
#命令 pvcreate [分区名] #增加物理卷 pvremove [分区名] #删除物理卷 pvscan #查看物理卷 pvdisplay #查看物理卷更详细 |
|
1 2 3 4 5 6 7 8 9 10 11 12 13 14 15 16 |
[root@localhost /]# pvcreate /dev/sdb5 Physical volume "/dev/sdb5" successfully created. [root@localhost /]# pvcreate /dev/sdb6 Physical volume "/dev/sdb6" successfully created. [root@localhost /]# pvcreate /dev/sdb7 Physical volume "/dev/sdb7" successfully created. [root@localhost /]# pvcreate /dev/sdb8 Physical volume "/dev/sdb8" successfully created. [root@localhost /]# pvscan PV /dev/sdb7 lvm2 [2.00 GiB] PV /dev/sdb8 lvm2 [<2.00 GiB] PV /dev/sdb5 lvm2 [2.00 GiB] PV /dev/sdb6 lvm2 [2.00 GiB] Total: 4 [<8.00 GiB] / in use: 0 [0 ] / in no VG: 4 [<8.00 GiB] [root@localhost /]# |
[建立卷组]
|
1 2 3 4 5 6 |
#命令 vgcreate [选项] [卷组名称] [物理卷1] [物理卷2] ... 支持多个卷组加入当前建立的物理卷 -s 指定当前卷组PE(格子)大小,默认4M,默认就挺好 vgscan 查看卷组 vgdisplay 查看卷组更详细 vgremove [卷组名称] 删除卷组 |
我将物理卷 /dev/sdb5 /dev/sdb6 新建为卷组scvg
|
1 2 3 4 5 6 7 8 9 10 11 12 13 14 15 16 17 18 19 20 21 22 23 24 25 |
[root@localhost /]# vgcreate scvg /dev/sdb5 /dev/sdb6 Volume group "scvg" successfully created [root@localhost /]# vgdisplay --- Volume group --- VG Name scvg System ID Format lvm2 Metadata Areas 2 Metadata Sequence No 1 VG Access read/write VG Status resizable MAX LV 0 Cur LV 0 Open LV 0 Max PV 0 Cur PV 2 Act PV 2 VG Size 3.99 GiB PE Size 4.00 MiB Total PE 1022 Alloc PE / Size 0 / 0 Free PE / Size 1022 / 3.99 GiB VG UUID FjIYeB-hu4j-UFpD-QIBJ-O26x-zQeM-9a1mXq |
[卷组扩容]
|
1 2 3 4 |
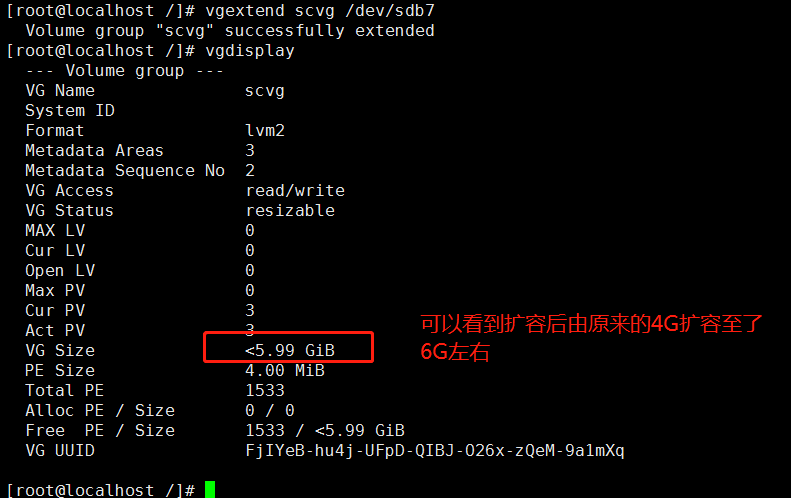
#命令 vgextend [卷组名称] [物理卷...] 如果我有更多的物理卷,都可以加进来 vgreduce scvg /dev/sdb7 删除扩容 |
我将/dev/sdb7 扩容加到卷组scvg中
|
1 2 3 4 5 6 7 8 9 10 11 12 13 14 15 16 17 18 19 20 21 22 23 24 25 26 |
[root@localhost /]# vgextend scvg /dev/sdb7 Volume group "scvg" successfully extended [root@localhost /]# vgdisplay --- Volume group --- VG Name scvg System ID Format lvm2 Metadata Areas 3 Metadata Sequence No 2 VG Access read/write VG Status resizable MAX LV 0 Cur LV 0 Open LV 0 Max PV 0 Cur PV 3 Act PV 3 VG Size <5.99 GiB PE Size 4.00 MiB Total PE 1533 Alloc PE / Size 0 / 0 Free PE / Size 1533 / <5.99 GiB VG UUID FjIYeB-hu4j-UFpD-QIBJ-O26x-zQeM-9a1mXq [root@localhost /]# |
通过卷组给LV扩容(常用)
|
1 2 3 4 |
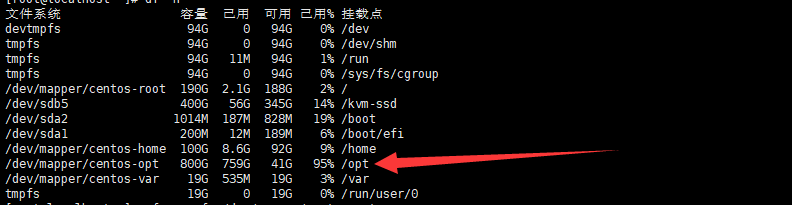
lvextend -L +1017.8G /dev/centos/opt #给这个lv卷扩容,扩容大小为vg空间范围内的大小(只要你这个所属卷组还有剩余空间,你的逻辑卷就可以扩容,当前剩余未1017.8G) xfs_growfs /dev/mapper/centos-opt #xfs_growfs 同步文件系统 df -h |

[通过卷组建立逻辑卷]
注:在卷组里建立(分出)逻辑卷 (我的scvg里现在又6个G我现在在vg里要开始划分逻辑卷了)
|
1 2 3 4 5 6 7 8 |
#命令 lvcreate [选项] -n [逻辑卷名称] [卷组名] -L 容量:指定当前逻辑卷容量单位:MB ,GB ,TB -l 个数:按照PE个数指定逻辑卷大小,需要换算,麻烦 -n 逻辑卷名称:指定逻辑卷名称 lvscan 查看逻辑卷 lvdisplay 看逻辑卷更详细 查看UUID什么的 UUID自动挂载需要用 随计算机启动 删lv: lvremove lv完整路径 |
|
1 2 3 4 5 6 7 8 |
[root@localhost /]# lvcreate -L 2G -n sclv1 scvg Logical volume "sclv1" created. [root@localhost /]# lvcreate -L 2G -n sclv2 scvg Logical volume "sclv2" created. [root@localhost /]# lvscan ACTIVE '/dev/scvg/sclv1' [2.00 GiB] inherit ACTIVE '/dev/scvg/sclv2' [2.00 GiB] inherit [root@localhost /]# |

我现在在scvg卷组里成功新建了2个逻辑卷,现在scvg里面剩余容量应该还有2G
[逻辑卷扩容]
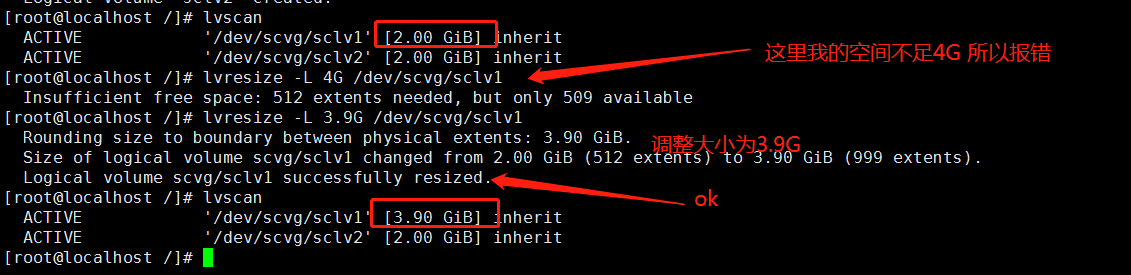
注意:逻辑卷扩容(只要你这个所属卷组还有剩余空间,你的逻辑卷就可以扩容)当前scvg卷组还剩余2G左右容量,我们把剩余容量给逻辑卷sclv1
|
1 2 3 4 5 6 7 8 |
#命令 lvresize [选项] [逻辑卷名称/dev/scvg/sclv1] -L 容量: 指定当前逻辑卷要扩容到的大小:单位MB,GB ,TB #注意这里指定大小为,逻辑卷总共大小,而不是在原来基础上增加多少,另外不要超过卷组的剩余空间 -l 个数: 按照PE个数指定逻辑卷大小,麻烦,不建议用 #如果你正在使用sclv1这个逻辑卷那么你需要执行这条命令通知你的挂载点,我增加了,你也要增加了,否则你sclv1挂载点的容量还是显示之前容量 resize2fs /dev/scvg/sclv1 lvremove [逻辑卷完成路径/dev/scvg/sclv1] |
|
1 2 3 4 5 6 7 8 9 10 11 |
[root@localhost /]# lvresize -L 4G /dev/scvg/sclv1 Insufficient free space: 512 extents needed, but only 509 available [root@localhost /]# lvresize -L 3.9G /dev/scvg/sclv1 Rounding size to boundary between physical extents: 3.90 GiB. Size of logical volume scvg/sclv1 changed from 2.00 GiB (512 extents) to 3.90 GiB (999 extents). Logical volume scvg/sclv1 successfully resized. [root@localhost /]# lvscan ACTIVE '/dev/scvg/sclv1' [3.90 GiB] inherit ACTIVE '/dev/scvg/sclv2' [2.00 GiB] inherit [root@localhost /]# |
|
1 2 3 4 5 6 7 8 9 10 11 12 13 14 15 16 |
#建立完逻辑卷后,该挂载挂载,该格式化格式化,随意用了 #格式化 mkfs -t ext4 /dev/scvg/sclv1 #注意:逻辑卷是在卷组里的所以挂载或者格式化的时候 注意自己的路径,可以使用lsblk查看关系 然后挂载使用即可 mount /dev/scvg/sclv1 /sclv_test 永久挂载需要修改/etc/fstab文件 推荐使用uuid挂载 #查看UUID方法blkid blkid /dev/scvg/sclv1 [root@project-monitor ~]# blkid /dev/scvg1/sclv1 /dev/scvg1/sclv1: UUID="5d059476-bee1-40c1-9c76-3757e9a0dcd0" TYPE="xfs" 挂载fstab: UUID=5d059476-bee1-40c1-9c76-3757e9a0dcd0 /home xfs defaults 0 0 |
好了我们用lsblk来看看所有可用设备,和他们的依赖关系
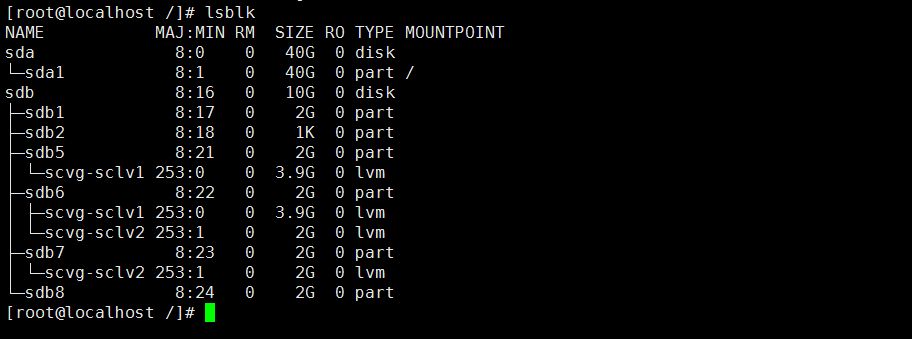
lsblk命令
|
1 2 3 4 5 6 7 8 9 10 11 12 13 14 15 |
-a, --all 显示所有设备。 -b, --bytes 以bytes方式显示设备大小。 -d, --nodeps 不显示 slaves 或 holders。 -D, --discard print discard capabilities。 -e, --exclude <list> 排除设备 (default: RAM disks)。 -f, --fs 显示文件系统信息。 -h, --help 显示帮助信息。 -i, --ascii use ascii characters only。 -m, --perms 显示权限信息。 -l, --list 使用列表格式显示。 -n, --noheadings 不显示标题。 -o, --output <list> 输出列。 -P, --pairs 使用key="value"格式显示。 -r, --raw 使用原始格式显示。 -t, --topology 显示拓扑结构信息。 |
附言:如果你要删除这个新建硬盘的分区,建议一层一层删,先删逻辑卷->卷组->物理卷->分区 否则可能报一些你意向不到的错误,也有可能不报错,因系统而异
- 本文固定链接: https://www.yoyoask.com/?p=253
- 转载请注明: shooter 于 SHOOTER 发表
这个作者貌似有点懒,什么都没有留下。