常用的环境有:dev、sit、uat、sandbox、pro
- dev就是开发环境(Development Environment),每个开发人员自己搭建的环境,当然一般也会在公司内部服务器搭建一些诸如数据库、分布式服务等公用的开发环境服务。
- sit就是系统集成测试环境(System Integration Testing Environment),主要目的是把系统的各个模块作为一个组进行测试。
- uat就是用户验收测试环境(User Acceptance Testing Environment),一般是对系统比较熟悉的人,对开发成果进行验收的环境。
- sandbox就是沙箱环境(Sandbox Environment),这个环境为的是最真实地模拟生产环境。
- pro就是生产环境(Production Environment),这个环境是我们最终交付的产品所运行的环境。
为什么要有这么多环境呢?答案是形势所迫。随着软件开发的分工日益精细化和软件系统的日益复杂化,不同环境所承担的职责不同,但最终目的是一样的:提高效率、保证质量、节约成本、保证收益。
分环境的实现方式有很多Spring Profile、Spring Boot等等都有不同的实现。
下面讲一个使用 maven profiles 实现分环境配置的方式。
比如我在不同的环境需要提供不同的配置文件,怎么实现呢?
首先在pom.xml增加如下几个环境的配置,并指定配置路径:
|
1 2 3 4 5 6 7 8 9 10 11 12 13 14 15 16 17 18 19 20 21 22 23 24 25 26 27 28 29 30 31 32 33 34 35 36 37 38 39 40 41 42 43 44 45 46 47 48 49 50 51 52 53 54 55 56 57 58 59 60 61 62 63 64 65 66 67 68 69 |
<profiles> <!-- 分环境profile> --> <profile> <id>dev</id> <!-- 如果dev带上activeByDefault,会默认将dev下的配置复制到config目录下--> <activation> <activeByDefault>true</activeByDefault> </activation> <properties> <env>dev</env> <package.target>dev</package.target> <spring.profiles.active.value>dev</spring.profiles.active.value> <yui.skip>true</yui.skip> <config.path>src/main/resources/config/dev</config.path> </properties> </profile> <!--sit--> <profile> <id>sit</id> <properties> <env>sit</env> <package.target>sit</package.target> <spring.profiles.active.value>sit</spring.profiles.active.value> <yui.skip>false</yui.skip> <config.path>src/main/resources/config/sit</config.path> </properties> </profile> <!-- uat --> <profile> <id>uat</id> <properties> <env>uat</env> <package.target>uat</package.target> <spring.profiles.active.value>uat</spring.profiles.active.value> <yui.skip>false</yui.skip> <config.path>src/main/resources/config/uat</config.path> </properties> </profile> <!--sandbox--> <profile> <id>sandbox</id> <properties> <env>sandbox</env> <package.target>sandbox</package.target> <spring.profiles.active.value>sandbox</spring.profiles.active.value> <yui.skip>false</yui.skip> <config.path>src/main/resources/config/sandbox</config.path> </properties> </profile> <!--prod--> <profile> <id>prod</id> <properties> <env>prod</env> <package.target>prod</package.target> <spring.profiles.active.value>prod</spring.profiles.active.value> <yui.skip>false</yui.skip> <config.path>src/main/resources/config/prod</config.path> </properties> </profile> </profiles> |
然后在打包项目的时候通过-P参数指定环境就行了。例如打包uat环境:
|
1 |
mvn install -Puat |
指定环境打包的缺点
|
1 2 3 4 5 |
首先就是慢,也可说浪费咖啡。很多大型项目每次从编译到拉文件都要半个多小时。 那怎么节省发布的时间,让我们早点下班呢?答案就是所有环境一个包。 5个环境就能节省好几个小时,划算! |
只打一个包
怎么所有环境一个包呢?
首先在pom.xml配置maven-resources-plugin插件,并指定copy-resources的路径,把所有环境的配置都打到包里。
|
1 2 3 4 5 6 7 8 9 10 11 12 13 14 15 16 17 18 19 20 21 22 23 24 |
<!-- maven-resources-plugin --> <plugin> <artifactId>maven-resources-plugin</artifactId> <version>2.6</version> <executions> <execution> <id>copy-resources</id> <phase>validate</phase> <goals> <goal>copy-resources</goal> </goals> <configuration> <outputDirectory>${basedir}/target/classes/config</outputDirectory> <resources> <resource> <directory>${config.path}/</directory> <filtering>true</filtering> </resource> </resources> </configuration> </execution> </executions> </plugin> |
然后正常使用mvn install打包。
最后把要发布的包复制到指定环境机器的磁盘上以后,通过mv命令把需要发布的环境的配置移动出来。例如发布sandbox环境:
|
1 |
mv config/sandbox/* config/ |
当然这个操作不是必须的,比如你在启动容器的时候指定了当前的环境,然后通过${spring.profile.active}来指定当前读取哪个目录下的配置也可以。
下来说说git分支管理
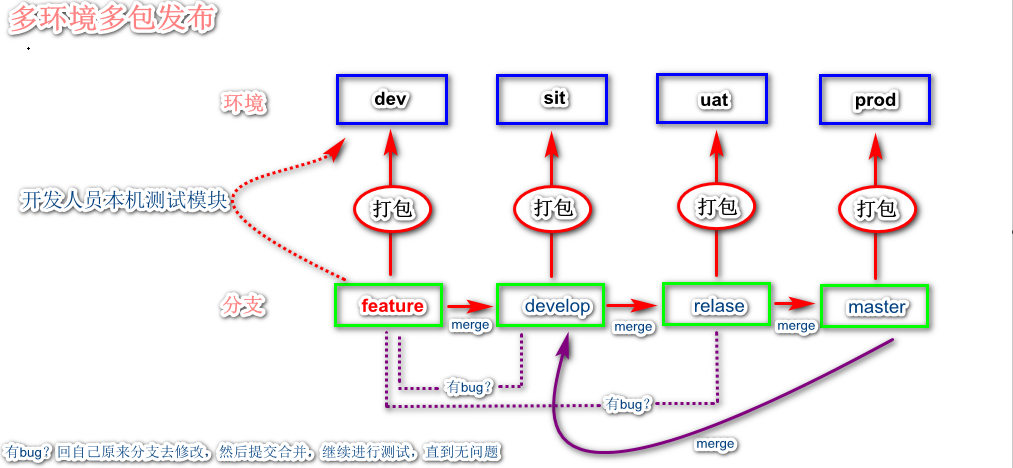
多环境多包发布
根据每个环境打不同的包,发布一个新的feature到生产需要类似下面这样的流程:
- 0.开发人员首先在自己本机环境测试个人分支feature,如果功能无问题,merge到develop,然后用develop打包到sit测试,测试通过后合并到relase
- 然后用relase打包发布到uat环境,测试通过后合并到master分支(打tag)
- 最后用master分支打包,发布到生产环境。 开发人员只能在develop分支和feature分支改代码(最好是在feature分支改),master分支与线上运行的代码保持一致。
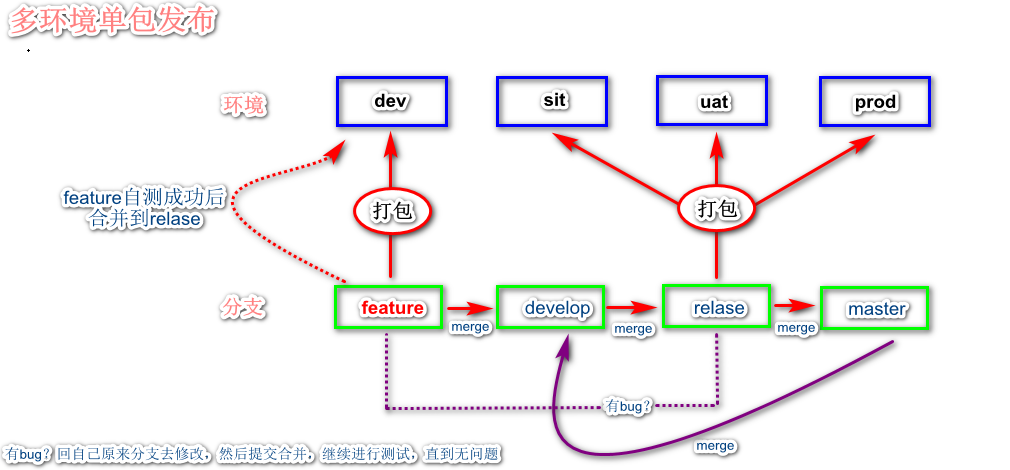
多环境单包发布
打一个包发布所有环境以后,分支管理模式将改为:
- 功能在feature分支自测成功以后,将代码合并到release分支,测试人员在release分支测试并最终发布生产。
- 当代码成功发布生产以后,将release分支代码合并到master 分支。
多环境多包发布
- 每个环境分别打包发布,直至最后所有环境测试通过发布生产。
- 最后将master分支的代码merge到develop分支,保证develop分支的代码与线上代码一致。
多环境单包发布
- 只在release分支打一个包,供所有环境发布。测出bug则重新打包,直至所有bug都测试通过。
- 使用release分支打的包发布成功以后,会将release分支的代码merge到master分支备份,方便日后hotfix等。
- 最后将master分支的代码merge到develop分支,保证develop分支的代码与线上代码一致。
版本检查
现在解决了打包慢的问题,但是怎么保证运维人员发布的代码版本跟我们功能所在的版本一致呢?
当然可以口头确认,但是人会撒谎的,特别是出现错误的时候。 那么我们能不能自己检查呢?那就要借助工具了。
git-commit-id-plugin
git-commit-id-plugin是一个插件,会根据当前分支的版本号生成一个git.properties文件。
首先在pom.xml引入插件配置:
|
1 2 3 4 5 6 7 8 9 10 11 12 13 14 15 16 17 18 19 20 21 22 23 24 25 26 27 28 29 30 31 32 33 34 |
<!-- https://github.com/git-commit-id/maven-git-commit-id-plugin --> <plugin> <groupId>pl.project13.maven</groupId> <artifactId>git-commit-id-plugin</artifactId> <version>${git-commit-id-plugin.version}</version> <executions> <execution> <id>get-the-git-infos</id> <goals> <goal>revision</goal> </goals> </execution> </executions> <configuration> <!-- 使properties扩展到整个maven bulid 周期, Ref: https://github.com/ktoso/maven-git-commit-id-plugin/issues/280 --> <injectAllReactorProjects>true</injectAllReactorProjects> <dateFormat>yyyy.MM.dd HH:mm:ss</dateFormat> <verbose>true</verbose> <!-- 是否生 git.properties 属性文件 --> <generateGitPropertiesFile>true</generateGitPropertiesFile> <!--git描述配置,可选;由JGit提供实现; --> <gitDescribe> <!--是否生成描述属性 --> <skip>false</skip> <!--提交操作未发现tag时,仅打印提交操作ID --> <always>false</always> <!--提交操作ID显式字符长度,最大值为:40;默认值:7; 0代表特殊意义;--> <abbrev>7</abbrev> <!--构建触发时,代码有修改时(即"dirty state"),添加指定后缀;默认值:""; --> <dirty>-dirty</dirty> <forceLongFormat>false</forceLongFormat> </gitDescribe> </configuration> </plugin> |
接着打包项目,你就可以看到自己编译的文件下面多了一个git.properties文件:
|
1 2 3 4 5 6 7 8 9 10 11 12 13 14 15 16 17 18 19 20 21 22 23 |
#Generated by Git-Commit-Id-Plugin #Sat Apr 20 13:08:01 CST 2019 git.branch=master git.build.host=DESKTOP-12GT5DQ git.build.time=2019.04.20 13\:08\:01 git.build.user.email=ijiangtao@foxmail.com git.build.user.name=ijiangtao git.build.version=1.1.01.01-SNAPSHOT git.closest.tag.commit.count= git.closest.tag.name= git.commit.id=67b60eeffa9deca877c2b9a28d52a40d3ea55444 git.commit.id.abbrev=67b60ee git.commit.id.describe=67b60ee git.commit.id.describe-short=67b60ee git.commit.message.full=\u53D1\u9001\u91CD\u8981\u6570\u636E\u7ED9\u8001\u677F~~~~ git.commit.message.short=\u53D1\u9001\u91CD\u8981\u6570\u636E\u7ED9\u8001\u677F~~~~ git.commit.time=2019.04.20 12\:57\:50 git.commit.user.email=ijiangtao@foxmail.com git.commit.user.name=ijiangtao git.dirty=false git.remote.origin.url=https\://github.com/javastudydemo/jsd-maven.git git.tags= git.total.commit.count=2 |
有了这个文件,我们就可以清晰地知道生产环境的代码是什么版本了。
需要特别注意的是,使用这个插件要保证你编译的项目是有.git目录的,因为这个插件要获取git的提交信息,如果不使用git进行版本管理的项目,编译会报错。
- 本文固定链接: https://www.yoyoask.com/?p=1502
- 转载请注明: shooter 于 SHOOTER 发表