1.安装依赖
|
1 |
yum -y install httpd gcc glibc glibc-common *gd* php php-mysql |
2.创建运行身份
|
1 2 3 4 |
groupadd nagcmd # 创建运行组 useradd -m nagios # 创建运行用户 nagios usermod -a -G nagcmd nagios # 将 nagios 用户添加到 nagcmd 组中 usermod -a -G nagcmd apache # 将 apache 用户添加到 nagcmd 组中 |
3.编译安装 nagios:
下载地址
|
1 |
https://zh.osdn.net/projects/sfnet_nagios/releases/ |
|
1 2 3 4 5 6 7 8 |
tar zxf nagios-4.4.5.tar.gz # 解压 Nagios 源码包 cd nagios-4.4.5 ./configure --with-command-group=nagcmd --enable-event-broker # 生成 Nagios #Makefile 文件 make all make install make install-init make install-commandmode make install-config |
到这步完成

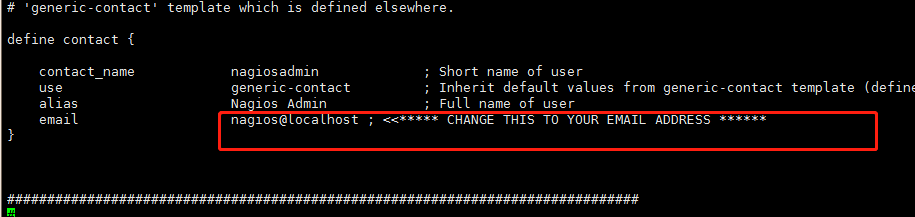
查看配置文件内容
|
1 |
vi /usr/local/nagios/etc/objects/contacts.cfg |
安装web模板
|
1 2 3 4 5 6 |
make install-webconf htpasswd -c /usr/local/nagios/etc/htpasswd.users nagiosadmin #这里注意下这个用户必须是nagiosadmin,否则后期会出现错误 #重启下apache service httpd restart |
2.nagios如果想工作还必须安装nagios-plugins插件
|
1 |
下载地址:https://www.nagios.org/downloads/nagios-plugins/ |
|
1 2 3 4 5 |
tar zxf nagios-plugins-2.3.3.tar.gz cd nagios-plugins-2.3.3 ./configure --with-nagios-user=nagios --with-nagios-group=nagios --with-mysql --enable-perl-modules make && make install |
如果编译的时候遇到如下错误
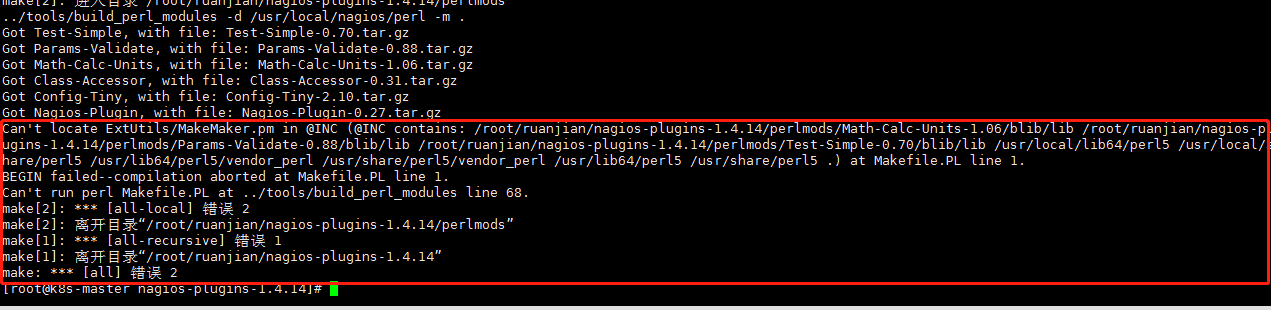
执行
|
1 2 |
yum install perl-ExtUtils-CBuilder perl-ExtUtils-MakeMaker 就可以了 |
3.配置并启动 Nagios
|
1 2 3 4 5 |
chkconfig --add nagios chkconfig nagios on #检测配置文件是否正常 /usr/local/nagios/bin/nagios -v /usr/local/nagios/etc/nagios.cfg service nagios start |
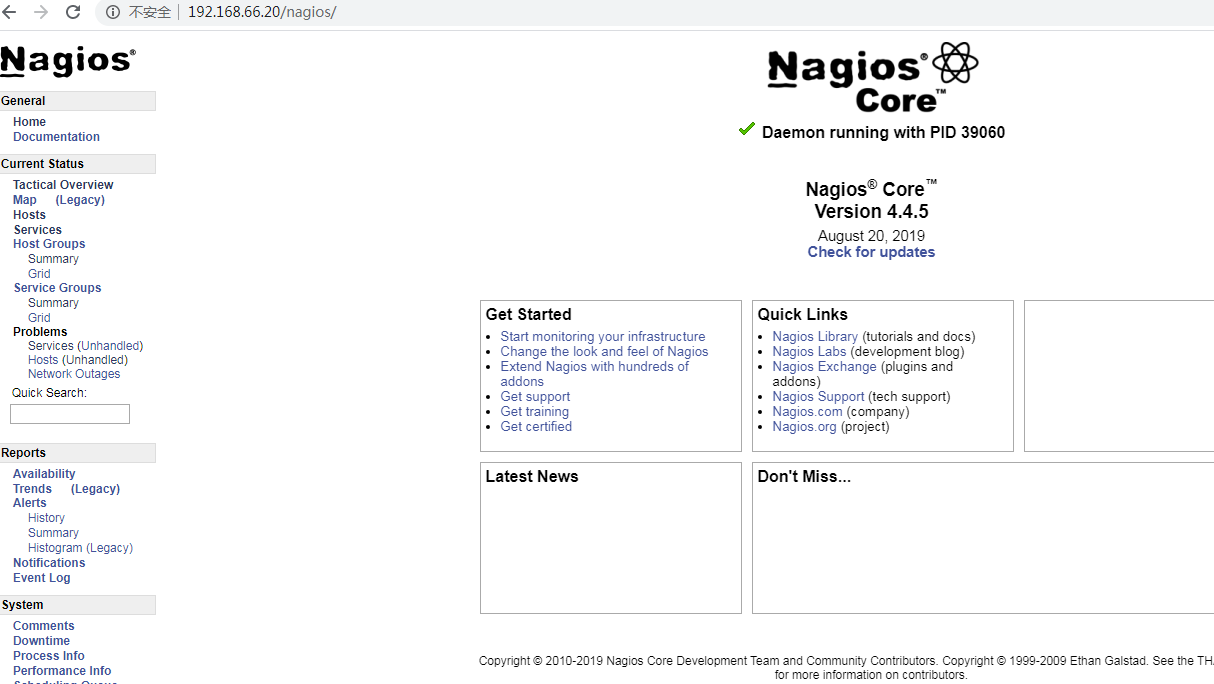
4.访问
|
1 2 3 |
http://192.168.66.20/nagios 输入账号:nagiosadmin 密码:你上面设置的密码 |

|
1 2 3 4 |
这里报了个WARNING 是因为apached的目录下没有主页文件,他访问失败了。 我们可以添加个主页文件 echo 'test'> /var/www/html/index.html #默认apache配置文件是这个目录 大概几分钟后WARNING就会显示正常ok |
添加监控主机
我们要去监控一台主机,我们必须得了解他的监控方式,所以我们得先了解nagios的各个目录作用。
|
1 2 3 4 5 6 7 8 9 10 11 12 13 14 15 |
cd /usr/local/nagios ls bin etc include libexec perl sbin share var 1.bin:存放命令的目录 2.etc:存放配置文件的目录 cgi.cfg #跟编程接口有关 htpasswd.users #apahce认证认证文件 nagios.cfg #nagios主配置文件 objects #对象目录 监控文件目录 resource.cfg #宏的配置文件 3.libexec #存放的check脚本 4.sbin #管理员的命令 5.share #nagios的网页文件 6.var #日志以及一些动态数据 |
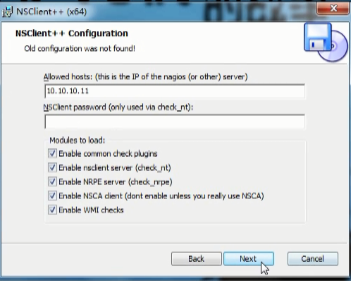
配置windows端监控
|
1 2 3 4 5 6 7 8 9 10 11 12 13 14 15 16 17 18 19 20 21 22 23 24 25 26 27 28 29 30 31 32 33 34 35 36 37 38 39 40 41 42 43 44 45 46 47 48 49 50 |
1.被监控端安装 NSClient++-0.3.8-Win32.msi 2.安装完成后修改配置文件 NSC.ini 把需要的库都打开 3.在监控服务器上修改 nagios 配置文件 nagios.cfg vim /usr/local/nagios/etc/objice/windows.cfg define host{ use windows-server ; Inherit default values from a template host_name win7 ; The name we're giving to this host #自己定义 alias My Windows Server ; A longer name associated with the host address 192.168.6.191 ; 你主机的 IP } #windows监控里,windows组必须存在 define hostgroup { hostgroup_name windows-servers ; The name of the hostgroup alias Windows Servers ; Long name of the group } #监控模板 define service { use generic-service host_name win7 #注意这里与你上头定义的hostname要对应 service_description NSClient++ Version check_command check_nt!CLIENTVERSION } #定义启动时间 define service { use generic-service host_name win7 service_description Uptime check_command check_nt!UPTIME } #cpu监控 define service { use generic-service host_name win7 service_description CPU Load check_command check_nt!CPULOAD!-l 5,80,90 } 等等iis模块啊 什么的 都需要替换成你的hostname 这里就不一一说明了,nagios的监控对象有上千万个. 看你自己需要定义什么查看官方文档就行 当然了object下定义的监控文件,需要在nagios.cfg 配置文件里添加配置调用. 打开nagios.cfg打开看下就懂 cfg_file=/usr/local/nagios/etc/objects/windows.cfg |
配置 linux 端监控
nrpe下载地址
|
1 |
https://zh.osdn.net/projects/sfnet_nagios/releases/ |
|
1 2 3 4 5 6 7 8 9 10 11 12 13 14 15 16 17 18 19 20 21 |
提前安装下这个,否则报错 0. yum install -y openssl openssl-devel 1.创建用户 useradd nagios 2、为了安装 nrpe,先安装 nagios-plugins-2.3.3.tar.gz 插件 tar zxf nagios-plugins-2.3.3.tar.gz cd nagios-plugins-2.3.3 ./configure --with-nagios-user=nagios --with-nagios-group=nagios make all make install 3.安装 nrpe tar -zxvf nrpe-4.0.2.tar.gz cd nrpe-4.0.2 ./configure --enable-ssl --with-ssl-lib=/usr/lib64/ make all make install-plugin make install-daemon make install-daemon-config 大于3.2.1的版本执行 make install-config |
配置 nrpe 信息
|
1 2 3 4 5 |
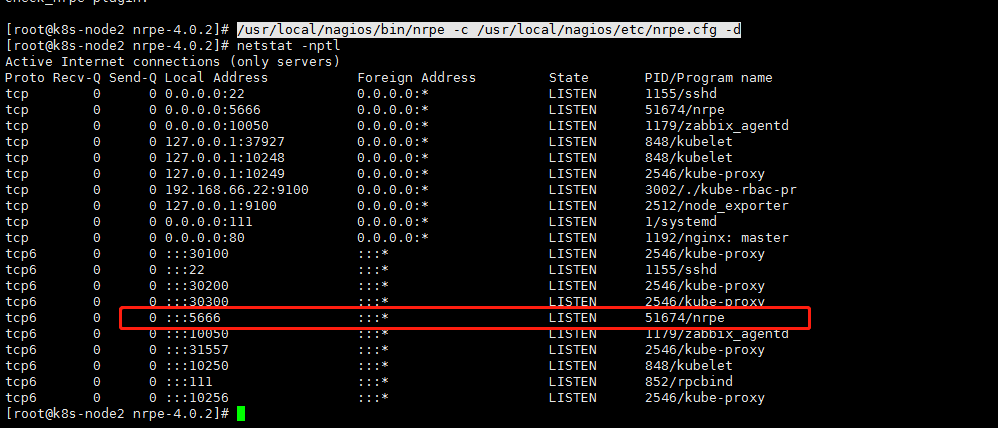
vim /usr/local/nagios/etc/nrpe.cfg allowed_hosts=192.168.66.20,127.0.0.1 #这里添加下监控server端机器地址 #守护进程运行 /usr/local/nagios/bin/nrpe -c /usr/local/nagios/etc/nrpe.cfg -d |
占用端口:5666
接着呢,我们去服务端安装nrpe插件
|
1 2 3 4 5 6 7 8 9 10 |
yum install -y openssl openssl-devel tar -zxvf nrpe-4.0.2.tar.gz cd nrpe-4.0.2 ./configure --enable-ssl --with-ssl-lib=/usr/lib64/ make all make install-plugin make install-daemon make install-daemon-config 大于3.2.1的版本执行 make install-config |
commands.cfg 定义外部构件 nrpe
|
1 2 3 4 5 |
cd /usr/local/nagios/etc/object cp windows.cfg linux.cfg vim linux.cfg 添加如下脚本: |
|
1 2 3 4 5 6 7 8 9 10 11 12 13 14 15 16 17 18 19 20 21 22 23 24 25 26 27 28 29 30 31 32 33 |
define host { use linux-server ; Inherit default values from a template host_name linux ; The name we're giving to this host alias My linux Server ; A longer name associated with the host address 192.168.66.22 ; IP address of the host } define service { use generic-service host_name linux service_description check-load check_command check_nrpe!check_load } #检测用户数 define service { use generic-service host_name linux service_description check-user check_command check_nrpe!check_users } #检测总进程 define service { use generic-service host_name linux service_description otal_procs check_command check_nrpe!check_total_procs } |
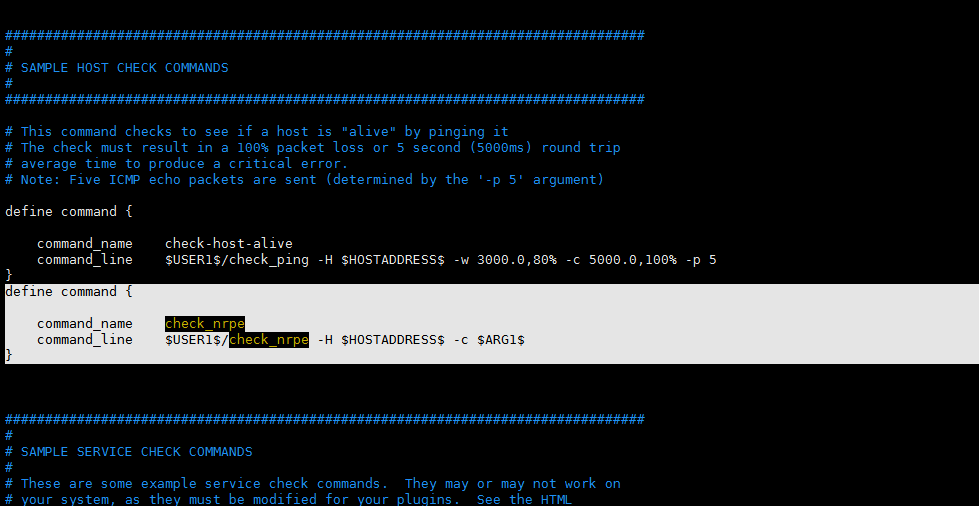
添加脚本后,查看一下check_nrpe脚本,在commands.cfg中是否存在,如果不存在则需要创建
|
1 2 3 4 5 6 |
define command { command_name check_nrpe command_line $USER1$/check_nrpe -H $HOSTADDRESS$ -c $ARG1$ } |
保存退出
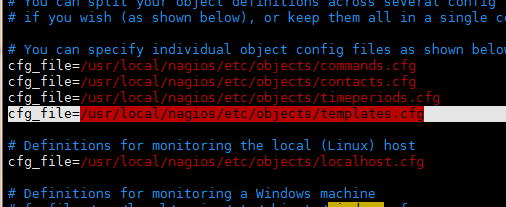
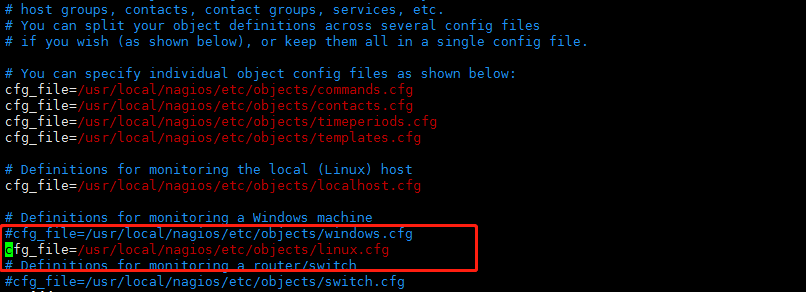
然后去主配置文件nagios.cfg主配置文件中,把定义的linux.cfg添加进来
|
1 2 3 4 |
vim /usr/local/nagios/etc/nagios.cfg 添加: cfg_file=/usr/local/nagios/etc/objects/linux.cfg |
|
1 2 |
#检测配置文件是否正常 /usr/local/nagios/bin/nagios -v /usr/local/nagios/etc/nagios.cfg |
然后重启服务
|
1 |
service nagios restart |
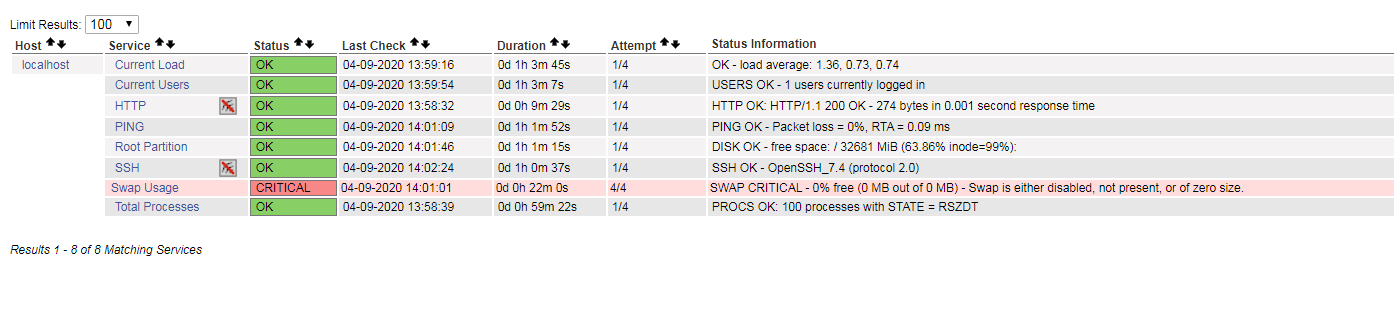
去web界面查看
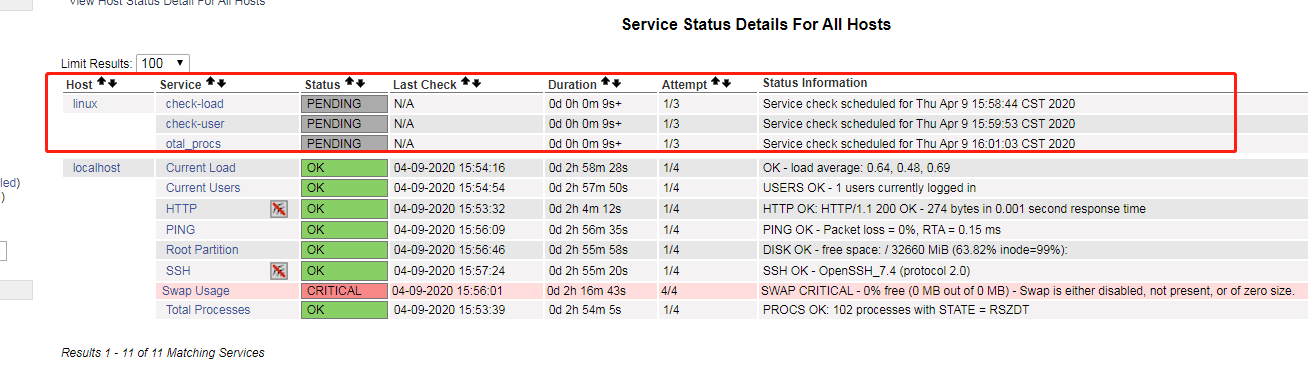
已经添加进来,准备状态
|
1 2 3 |
nagios安装包(nagios-4.4.5.tar.gz,nagios-plugins-2.3.3,nrpe-4.0.2.tar.gz) 链接:https://pan.baidu.com/s/1vIu9wPZk2uZKz2_GYcM0HQ 提取码:24vu |
- 本文固定链接: https://www.yoyoask.com/?p=2753
- 转载请注明: shooter 于 SHOOTER 发表
这个作者貌似有点懒,什么都没有留下。